
Case Overview
Tooth #31 presented with cold sensitivity, pain on biting, and lingering throbs after stimuli. A patient arrives after a weekend of throbbing lower-right pain. Clinical tests and periapical imaging supported a diagnosis of symptomatic irreversible pulpitis with early apical involvement, so root canal therapy was indicated. The case was challenging due to calcified mesial canals, a sharp distal root curvature, and limited mouth opening.
Mandibular molars often have two mesial canals and one distal canal, and canal shapes can be complex. In this tooth, previous restorations and deep caries likely contributed to canal calcification. Preoperative cone-beam data and angled radiographs were used to map canal trajectories and estimate curvature, which guided access planning. Rubber dam isolation and high magnification were essential to locate narrow canal orifices while preserving dentin. For readers wanting technique context, see endodontic treatment details.
Access was refined conservatively, then extended to achieve straight-line paths to the canals. Patency and glide paths were established with small hand files, using an apex locator to confirm working lengths. Given the curvature and sclerosis, a hybrid approach with hand files for negotiation and heat-treated nickel-titanium instruments for shaping was chosen to reduce file stress. Irrigation included warmed sodium hypochlorite for tissue dissolution, followed by EDTA to address smear layer. Because of tenderness and complex anatomy, the case was staged; calcium hydroxide was placed between visits, and occlusal contacts were lightened to ease biting pain.
At the second visit, canals were re-irrigated, dried, and obturated with a warm vertical technique to adapt to irregularities. A bonded core restored internal integrity, and the tooth was prepared for cuspal coverage to reduce fracture risk after endodontic treatment. Postoperative instructions focused on managing normal soreness and monitoring bite sensitivity. This rct mandibular molar case report highlights careful planning and staged care to protect a heavily stressed tooth. For long-term function, we discussed custom dental crown options. Next, we outline our imaging-guided access and canal negotiation strategy.
Initial Presentation
The patient arrived with lower right molar pain that worsened with cold and chewing. Night pain had begun over the weekend, and over-the-counter pain relievers offered little help. There was no facial swelling, but the patient reported difficulty opening fully due to soreness. A patient wakes at night holding the lower right jaw.
Medical history was reviewed, including allergies and current medications, with no contraindications to local anesthesia. Extraoral findings were normal, and there was no lymph node tenderness. Intraorally, tooth #31 had a large posterior restoration and adjacent deep caries. The soft tissues were intact, with no sinus tract or gingival swelling noted.
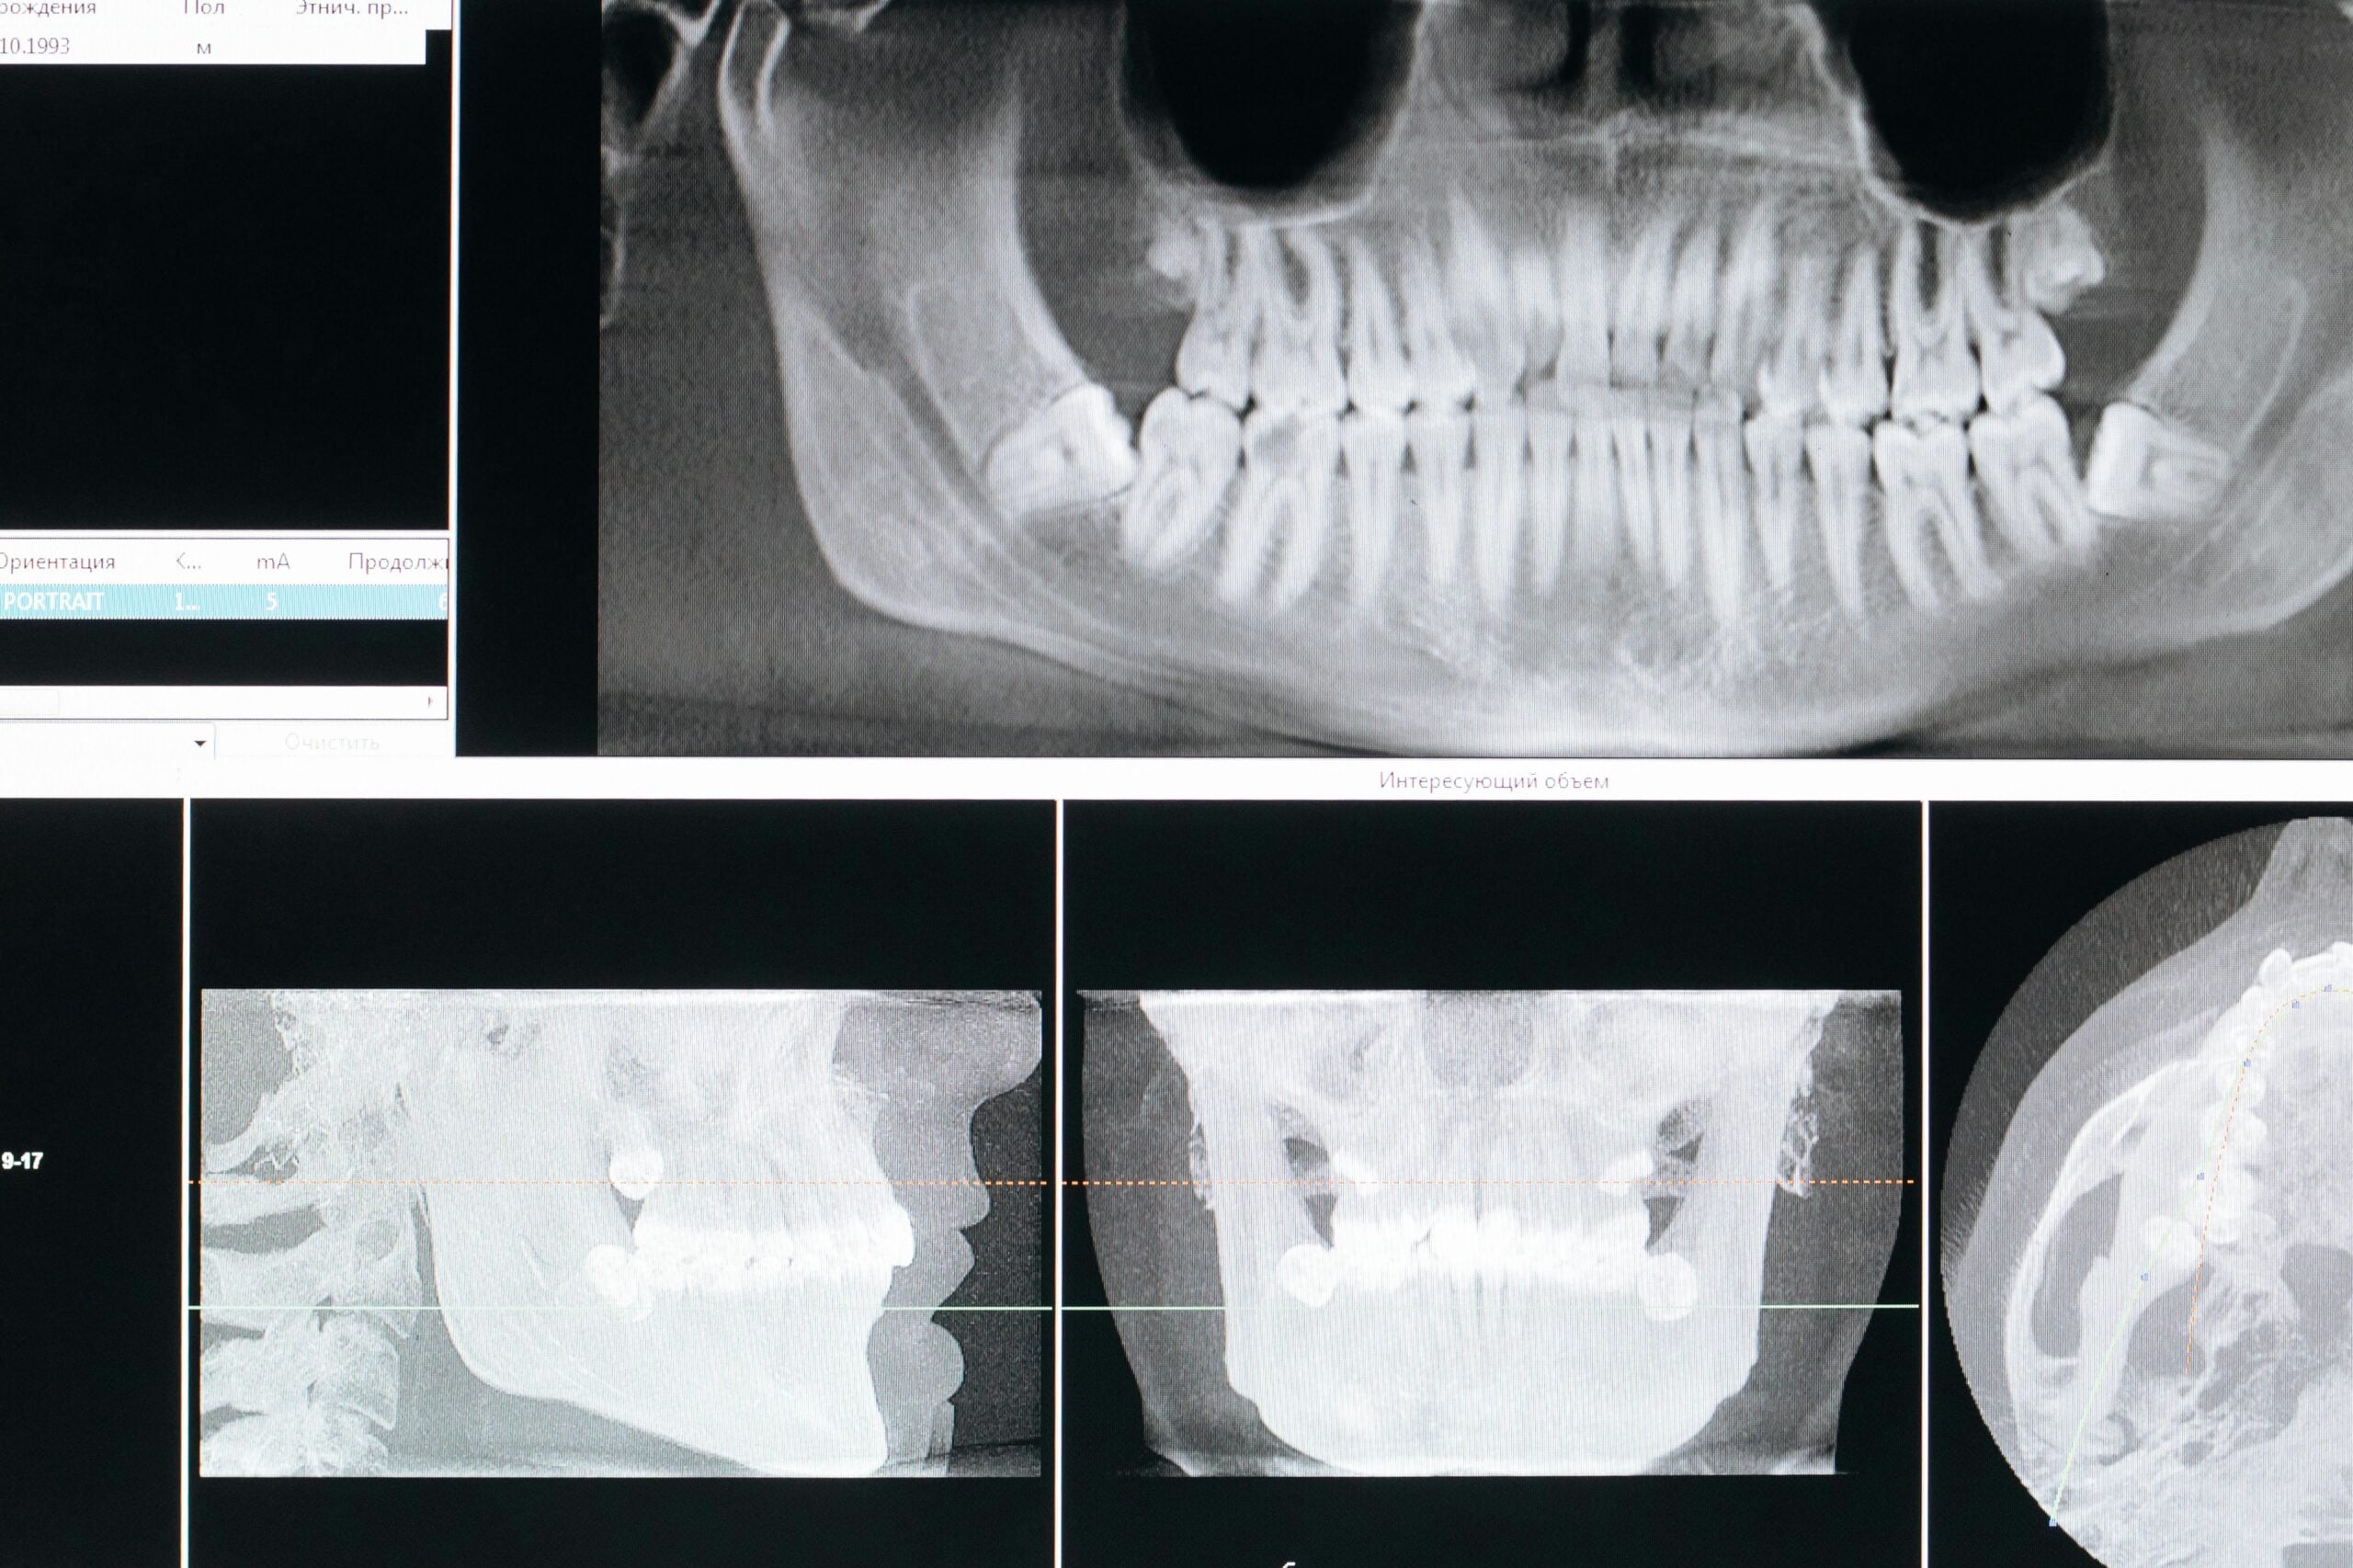
Baseline occlusion showed the tooth was in function, and biting on a cotton roll reproduced sharp pain. Probing depths were within normal limits throughout, so a periodontal source was unlikely. Cold testing on #31 produced an intense, lingering response compared with a normal, brief response on the control tooth. Percussion was mildly tender, and palpation of the buccal vestibule was slightly sensitive, consistent with early periapical involvement. Electric pulp testing supported pulpal responsiveness but with an exaggerated pain profile, aligning with symptomatic irreversible pulpitis. Periapical radiographs revealed deep caries approaching the pulp, sclerosis in the mesial root area, and periodontal ligament widening at the apex of the distal root. Given the prior restorative history and limited opening noted at intake, we anticipated complex root anatomy and possible calcification that would influence access and instrument selection.
We discussed the findings in plain language, explaining that the nerve tissue inside the tooth was inflamed and could not heal on its own. We outlined root canal therapy as the next step, including numbing strategies, careful canal location under magnification, and a staged approach if symptoms persisted. Because the patient was anxious and had limited opening, we also reviewed options for gentle oral sedation support to improve comfort and safety.
Clear expectations were set about temporary post-visit soreness, soft-chewing recommendations, and when to call for help. In this rct mandibular molar case report, the initial presentation framed a careful, stepwise plan tailored to anatomy and symptoms. Next, we detail our imaging-guided access and canal negotiation strategy.
Diagnostic Workup
Our diagnostic workup for tooth #31 combined a clear history, focused clinical tests, and targeted imaging. We separated pulp status from apical status, then cross-checked findings on a healthy control tooth. A patient taps the tooth with a fingernail and winces. Together, these steps confirmed the source of pain and guided safe planning for treatment.
We began with symptom timing and triggers, asking how cold, chewing, and night pain behaved. Thermal testing with cold assessed vitality and whether pain lingered, which suggests inflamed, irreversibly damaged pulp. Electric pulp testing added a second measure of responsiveness. Percussion and palpation screened for periapical inflammation, while a bite test localized pain under heavy function. Probing depths were recorded to rule out periodontal defects that can mimic endodontic pain. Occlusion was checked to see if a high contact was amplifying symptoms.
To visualize anatomy, we took multiple angled periapical radiographs. We looked for subtle periodontal ligament widening, changes in the lamina dura, and hints of canal sclerosis. Given suspected calcification and curvature, limited field CBCT data helped map canal paths and curvatures before access, while keeping dose in mind. These images informed access angulation, anticipated instrument stress points, and the need for a staged approach if symptoms persisted.
When cracks are in the differential, transillumination and selective staining can expose hidden lines, and isolated deep probing defects can support that concern. If diagnostic ambiguity remains between adjacent teeth, selective anesthesia can clarify the source. Limited opening factored into planning; we used bite blocks, shorter handles where helpful, and scheduled adequate time to avoid rushing. For anxious patients or those unable to tolerate long visits, we discussed comfort-focused care, including considerate pacing and, when appropriate, deep sedation options.
All findings were synthesized into a written pulpal and periapical diagnosis, then matched with a treatment plan. In this rct mandibular molar case report, the workup ensured we treated the true cause, not just the symptoms. A careful diagnosis sets the tone for predictable care.
Treatment Plan
Our plan was a staged root canal therapy for #31 to remove inflamed tissue, disinfect the canals, and seal the tooth. Because of calcified mesial canals, a curved distal root, and limited opening, we scheduled shorter visits with careful access under high magnification. Pain control included profound local anesthesia and light occlusal adjustment to ease chewing. A bonded core and timely cuspal coverage would protect the tooth after treatment.
A work meeting is interrupted by a sharp bite on the lower right. That real-world pattern guided priorities: fast pain relief, controlled cleaning, and preservation of dentin. We reviewed risks and benefits, including the small chance of an extra appointment if tenderness persisted. If we discovered a crack or nonrestorable structure, we would pause and discuss alternate options before proceeding.
Preoperative imaging set the access angle and anticipated curvature, so we could conserve tooth structure while still reaching all canals. Under rubber dam isolation, we planned conservative access, ultrasonic troughing to uncover calcified orifices, and early scouting with size 6–10 hand files. Working lengths would be confirmed with an apex locator, then verified radiographically if landmarks were unclear. Shaping would proceed only after a smooth glide path, using heat-treated nickel-titanium instruments at controlled torque to reduce file stress in the curved distal canal.
Cleaning emphasized chemistry and agitation. We used warmed sodium hypochlorite for tissue dissolution, then EDTA to address smear layer, with gentle activation to reach fins and isthmuses. Given the sclerosis and symptoms, we planned calcium hydroxide between visits if needed, with a well-sealed temporary to prevent leakage. Occlusion would remain light until definitive restoration to reduce bite-triggered pain and cusp flexure.
At obturation, a warm vertical technique would adapt to irregular canal shapes, followed by a bonded core the same visit when feasible. We recommended early cuspal coverage to lower fracture risk and scheduled follow-up to check healing and function. In this rct mandibular molar case report, the plan balanced comfort, thorough disinfection, and structural protection. Thoughtful sequencing makes difficult molars manageable.
Irrigation Techniques Used
We used warmed sodium hypochlorite to dissolve tissue and disinfect, then EDTA to remove the smear layer. Activation was added to move solutions into hard‑to‑reach spaces, while careful needle control kept fluids inside the root. During cleaning, you may hear gentle buzzing as fluid moves through the tooth. Each step focused on cleaning fins and isthmuses without forcing liquid beyond the tip.
Sodium hypochlorite was gently preheated chairside to improve reactivity, then delivered with a side‑vented needle placed short of the working length. The solution was refreshed often so it stayed effective, and we used slow, controlled strokes to reduce pressure. Because the distal root had a sharp curve, apical negative pressure was used at times to draw irrigant safely to the apex without extrusion. This approach balanced strong chemistry with safety in a narrow, curved canal.
After shaping cycles, EDTA was used to chelate mineral and release the smear layer that can block dentin tubules. A short dwell allowed EDTA to work, followed by a final rinse sequence to flush loosened debris. We finished with a fresh aliquot of sodium hypochlorite so clean dentin surfaces received antimicrobial contact before drying. Solutions were kept separate to avoid unwanted precipitates, and canals were gently agitated only after patency and working length were secure.
Activation methods were selected to match the anatomy. In the calcified mesial canals, we used low‑power ultrasonic or sonic activation in short bursts, keeping the tip centered and nonbinding. This created streaming that carried irrigant into lateral spaces without contacting dentin. Between visits, calcium hydroxide maintained disinfection, so the second‑visit irrigation could focus on a clean finish rather than heavy tissue dissolution. Throughout, rubber dam isolation protected the mouth and kept the field sterile.
For patients, this means the tooth is cleaned by chemistry first, then by motion that helps the fluid reach places files cannot. In this rct mandibular molar case report, these irrigation choices supported healing while respecting a curved, calcified system. Thoughtful irrigation turns complex anatomy into a cleaner, safer space.
Orifice Flaring Methods
Orifice flaring gently widens the top of each canal to remove coronal interferences and create a straighter path. This improves file control, reduces binding, and helps irrigants reach deeper. In mandibular molars, careful flaring protects thin dentin near the furcation while setting up safer shaping. A patient cannot open wide, so instruments must work efficiently.
We begin only after locating each orifice under magnification and confirming patency with small hand files. Early coronal enlargement reduces torsional stress on shaping files and lets irrigant circulate without pressure. Heat-treated nickel-titanium orifice openers are used with a light brushing motion, always away from the furcation. When calcification blocks entry, short ultrasonic troughing exposes grooves without cutting into dentin unnecessarily.
Evidence supports a measured approach. Micro-CT data show that coronal flaring can improve the shaping ability of heat-treated nickel-titanium files, likely by easing file entry and reducing coronal interference [1]. In mandibular molars, different orifice-flaring burs remove different amounts of cervical dentin, so technique and instrument choice matter to preserve the furcal wall [2]. Mechanical properties also vary among flaring instruments; torsional resistance and bending stiffness influence how safely they perform in narrow, calcified entries [3].
Our method favors control over speed. We precurve small stainless steel files to scout, then perform conservative coronal enlargement before attempting deeper shaping. Anticurvature filing protects the “danger zone” on the furcal side. Gates-Glidden drills, if used, are limited to the straight coronal segment with a lateral brushing motion, not pushed apically. These steps create space for irrigants and reduce the load on later shaping files.
For patients, this means less stress on the tooth and smoother cleaning with fewer file hang-ups. In this rct mandibular molar case report, thoughtful orifice flaring supported safe negotiation of calcified mesial canals and a curved distal root. Next, we connect this coronal setup to efficient glide path development and shaping. The right start makes the rest of treatment more predictable.
Addressing the Tricky ML Canal
The mesiolingual (ML) canal in a lower molar can be narrow, calcified, and easy to miss. We addressed it by reading the dentin “map,” troughing carefully along the mesial groove, and scouting with very small, precurved hand files under high magnification. This method preserved dentin while improving our chance of finding and safely cleaning the true canal path.
A patient feels a cold zing on the lower right molar. In mandibular molars, the ML canal often sits slightly lingual to the mesial groove that links the mesial orifices. We first confirmed likely anatomy from angled radiographs and CBCT planning, then used ultrasonic troughing in tiny strokes to uncover an orifice hidden by a calcified shelf. Staining and the “champagne bubble” test with irrigant helped highlight micro-openings. When the explorer “catches” and the file drops slightly, that tactile cue often marks the pathway.
Negotiation came next, not shaping. We precurved size 6–10 stainless steel files, used EDTA gel for lubrication, and advanced with a watch-wind motion, withdrawing often to clean tips. If the file caught, we stepped back, recaptured glide, and expanded coronally a touch to reduce torsional stress. An apex locator set working length once a smooth, reproducible path was established. Only then did we introduce flexible, heat-treated nickel-titanium to enlarge the glide path safely.
Protection of the furcal wall guided every move. Anticurvature filing kept pressure away from the “danger zone,” and we avoided over-flaring that could thin cervical dentin. If the ML and MB canals connected as a fin rather than a separate tube, we treated it as an isthmus with irrigation and activation instead of forcing a second pathway. Warm vertical obturation adapted well to these irregular spaces, helping seal fins and confluences. In this rct mandibular molar case report, disciplined ML canal management supported thorough cleaning without unnecessary dentin loss.
For patients, this careful approach improves comfort and lowers the risk of missed anatomy. Small, careful moves make complex canals predictable.
Avoiding Instrument Separation
Instrument separation means a file breaks inside a canal. We avoid it by lowering file stress, keeping canals lubricated and open, and stopping the moment resistance changes. In this curved, calcified mandibular molar, our plan focused on glide path control, gentle motions, and careful file selection to protect both tooth and tools.
Two main failure modes drive separation: torsional lock when a tip binds while the shank keeps turning, and cyclic fatigue when a file flexes repeatedly in a curve. During shaping, the handpiece pauses as resistance increases. We mapped curvatures on imaging, then used small stainless steel hand files first to create a smooth, reproducible glide path. Flexible, heat-treated nickel-titanium files were introduced only after patency, with short working strokes, light apical pressure, and fresh lubricant to limit binding.
Control also depends on coronal space and debris removal. Conservative coronal enlargement reduces friction deeper in the canal, while frequent irrigation prevents packed dentin from grabbing a file. Limited opening adds leverage on instruments, so shorter handles and bite support helped us keep angles straight and motions precise. We inspected files under magnification between uses; any unwinding or shiny spots meant the file was retired before failure.
- Plan with angled images to estimate curve radius and working length.
- Establish and confirm patency and a true glide path before shaping.
- Create modest coronal clearance to reduce torsional load apically.
- Use torque‑controlled motors, short strokes, and fresh lubricant.
- Refresh irrigants, recapitulate with small files, and clear debris often.
- Limit file reuse, inspect for metal fatigue, and switch out at first warning signs.
If resistance changes, we stop, recapitulate, irrigate, and reassess rather than push. Should a fragment occur despite precautions, we explain options, which may include bypass, retrieval, or monitoring depending on position and cleanliness. For patients, these habits lower risk and help keep treatment smooth. In this rct mandibular molar case report, prevention came from planning, gentle technique, and constant feedback. Thoughtful control keeps instruments intact and canals clean.
Procedure Highlights
This section summarizes how we managed a difficult root canal on tooth #31, step by step. Our focus was comfort, safe canal negotiation, and a strong final seal. During lunch, a cold drink sparks a deep ache. In this rct mandibular molar case report, the highlights show how careful decisions protect a stressed tooth.
Profound anesthesia came first, with a standard inferior alveolar block and supplemental infiltration so we could work comfortably. Limited opening was addressed with a bite block and compact instruments. Under a rubber dam and high magnification, access was conservative, then refined to see the true canal entries while preserving dentin. Ultrasonic troughing exposed hidden anatomy without cutting into the furcation area.
Glide paths were created with small, precurved hand files using light watch-wind motions. Working lengths were set with an apex locator, then verified once the path was smooth and repeatable. Shaping used flexible, heat-treated files at controlled torque, with short strokes and frequent recapitulation to lower file stress. Irrigation was sequenced for effect and safety, using warmed sodium hypochlorite for dissolution, apical negative pressure where curves were tight, and EDTA to open dentin tubules before a fresh final rinse.
Because symptoms and calcification raised risk for flare-ups, treatment was staged. Calcium hydroxide was placed between visits to suppress residual bacteria, and occlusal contacts were lightened to reduce bite-triggered pain. At the second visit, canals were re-irrigated, dried to paper-point dryness, and obturated with a warm vertical technique to adapt to irregular fins and confluences. A bonded core restored internal strength immediately, and the tooth was scheduled for cuspal coverage to lower future fracture risk.
We closed with clear instructions about expected tenderness and how to protect the tooth as it heals. Follow-up checks focused on improving bite comfort and percussion response, along with interval imaging. These highlights show a calm, methodical approach that balances comfort, cleanliness, and strength. Thoughtful steps make tough molars predictable.
Outcome & Follow-Up
The outcome was favorable. Pain eased within 48 hours, and biting discomfort steadily declined after occlusal lightening. At the two‑week check, the tooth was comfortable for chewing, with only mild percussion tenderness that continued to improve. Radiographs at the short‑term visit showed stable periapical structures with no signs of new pathology.
Because the canals were curved and partially calcified, we staged care to lower flare‑up risk. Calcium hydroxide between visits kept bacteria suppressed, so the second visit could focus on a clean finish and a tight seal. After obturation, a bonded core restored internal strength, and we moved toward timely cuspal coverage to reduce fracture risk. This sequence let symptoms calm while protecting the remaining tooth.
Follow‑up focused on comfort, function, and healing. In the first 1–2 weeks, we checked bite comfort and soft tissue status, and adjusted occlusion as needed. We scheduled imaging at 6–12 months to assess bone healing around the roots. Signs of success include less tenderness, a return to normal chewing, narrower periodontal ligament space, and re‑forming lamina dura on radiographs. If deep bite pain, swelling, or a new sinus tract appears, we reassess early rather than wait. A patient bites on toast at breakfast without a twinge.
Home care was simple. Chew on the other side for a few days, avoid hard items until the final crown is placed, and keep the area clean with gentle brushing and flossing. Short courses of over‑the‑counter anti‑inflammatories can help soreness if medically appropriate. If you clench at night, a guard may reduce bite stress on the new restoration. For timing and visit planning, see our current hours. In this rct mandibular molar case report, steady symptom relief and planned reviews showed predictable recovery.
Takeaway: early comfort, a strong seal, and timely coverage support long‑term success.
Lessons Learned from the Case
Three lessons stood out. Plan precisely, then work gently. Use imaging to map anatomy, create safe straight‑line paths without overcutting, and stage care when symptoms or calcification raise risk. Early occlusal lightening and clear communication improve comfort and reduce surprises.
A patient finally sleeps through the night after treatment. Comfort starts with profound anesthesia, bite support for limited opening, and conservative access that preserves dentin. When canals are narrow or curved, progress slowly, confirm each step, and pause before pushing. Staging with an interim medicament can calm inflamed tissues, so the second visit focuses on sealing a clean, quiet system.
In complex mandibular molars, respect curvature and protect the furcal wall. Coronal interferences should be eased just enough to lower torsional loads on files, not to widen unnecessarily. Scout with small precurved hand files, establish a true glide path, and verify working length electronically before introducing flexible nickel‑titanium. If resistance changes, stop, recapitulate, irrigate, and reassess rather than force a tool deeper.
Cleaning works best when chemistry does the heavy lifting. Warmed sodium hypochlorite and EDTA are more effective when refreshed often, agitated gently, and kept safely inside the root. In tight curves, apical negative pressure helps deliver irrigant to the apex while reducing extrusion risk. Choose obturation that adapts to fins and confluences, then place a bonded core and plan timely cuspal coverage to lower fracture risk.
For patients, these habits mean fewer flare‑ups, smoother visits, and a stronger tooth afterward. For clinicians, this rct mandibular molar case report reinforces a simple flow: plan, verify, and proceed only when the canal says yes. Thoughtful steps protect both tooth and instruments. Takeaway: slow, verified progress beats speed in curved, calcified molars.
Frequently Asked Questions
Here are quick answers to common questions people have about Case Report: Challenging RCT on #31 in Glendale, AZ.
- What is the importance of irrigation during a root canal procedure?
Irrigation in root canal therapy helps clean out bacteria, tissue, and debris from the canals. Solutions like sodium hypochlorite dissolve organic material, while EDTA removes the smear layer, allowing deeper penetration of antibacterial agents. Activation techniques move fluids into hard-to-reach spaces, ensuring thorough cleaning. These steps help prevent reinfection and contribute to the success of the treatment by making sure the canals are as clean as possible.
- How are calcified canals located and negotiated during a root canal treatment?
Calcified canals can be challenging to navigate, but using preoperative imaging like CBCT and angled radiographs helps map out the canal pathways. High magnification and ultrasonic troughing may reveal hidden canal openings. Very small, precurved hand files are typically used to cautiously explore these canals. Once the canal path is located, careful use of lubricants and small instruments aids in creating a glide path, ensuring the procedure remains safe and effective.
- What are common methods to avoid file breakage during root canal treatment?
To prevent instrument separation, dentists use methods like creating a smooth glide path before shaping and using flexible files. Short working strokes and controlling torque help decrease the stress on files in curved canals. Regular irrigation prevents debris build-up, and inspecting for early signs of file wear helps avoid full breakage. Early detection and stopping at the first sign of resistance also contribute to preventing file separation.
- Why is proper access crucial in root canal treatment for molars?
Proper access during a root canal on molars ensures straight-line entry into the canals and reduces stress on dental instruments. Using magnification and rotary or ultrasonic instruments, dentists refine access to protect important tooth structures. This setup simplifies locating and cleaning canal orifices, especially in complex cases involving calcification and curvature, enabling longer-term success by preserving as much healthy tooth structure as possible.
- What role does imaging play in planning root canal treatment?
Imaging is crucial for understanding tooth anatomy before a root canal procedure. Tools like CBCT and angled radiographs reveal canal shapes, curvature, and any abnormalities or calcifications. This information guides the dentist in planning the most effective and safe access strategy. It helps in anticipating challenges, selecting appropriate tools, and ensuring a smoother and more successful root canal treatment.
References
- [1] Influence of Coronal Flaring on the Shaping Ability of Two Heat-Treated Nickel-Titanium Endodontic Files: A Micro-Computed Tomographic Study. (2023) — PubMed:36615157 / DOI: 10.3390/jcm12010357
- [2] Effects of Gates-Glidden, LA Axxess and orifice shaper burs on the cervical dentin thickness and root canal area of mandibular molars. (2011) — PubMed:21519644 / DOI: 10.1590/s0103-64402011000100004
- [3] Evaluation of Torsional Resistance and Bending Stiffness of Coronal Flaring Nickel-Titanium Instruments. (2021) — PubMed:34967334 / DOI: 10.14744/eej.2021.25238