Understanding Dental X-Rays Basics
Dental X-rays are pictures that show teeth, bone, and areas under the gums. They help find cavities between teeth, infections at the roots, and bone changes you cannot see in the mirror. Dentists choose the type and timing of X-rays based on your needs, not a fixed schedule. The goal is clear diagnosis with the lowest reasonable radiation.
You are handed a printout after your checkup. On most dental X-rays, dense structures like fillings and enamel look white, and less dense areas look darker. Cavities often appear as darker shadows, while healthy enamel looks lighter and smooth. Bone looks speckled and lighter than teeth, and sinus spaces appear dark and air-filled. With this basic map in mind, the next step is knowing which view you are looking at.
- Bitewing: shows upper and lower back teeth together to spot cavities and bone levels.
- Periapical: focuses on a few teeth from crown to root tip to check for infections or fractures.
- Panoramic: a wide view of jaws, sinuses, and all teeth to see growth, impaction, or cysts.
- CBCT (3D): used when precise detail is needed, such as complex roots or implant planning.
If you wonder how to read dental x rays, start by finding orientation marks, then compare both sides for symmetry. A periapical image can reveal a dark halo at a root tip, which may suggest a nerve infection; your dentist can explain how root canal treatment addresses infections at the root. Bitewings highlight thin dark triangles between teeth, often early cavities. Panoramic views show the “big picture,” but fine detail is lower than close-up images. Your dentist selects the view that best answers the clinical question.
Safety matters. Modern digital X-rays use very small doses, and dentists follow the ALARA principle, which means using as little radiation as reasonably achievable. Panoramic images can also show the position of wisdom teeth and their roots near nerves; this helps guide decisions about wisdom tooth removal and monitoring. Next, we will look at common signs to help you understand your own images. Clear images support timely, conservative care.
Types of Dental X-Rays Explained
Dental X-rays come in several types, and each one highlights different structures. Intraoral views include bitewing, periapical, and occlusal images. Extraoral views include panoramic, cephalometric, and 3D CBCT scans. If you want to understand how to read dental x rays, first identify which type you are viewing.
Intraoral images are the close-up pictures. Bitewings capture the crowns of the back teeth with a consistent angle, which helps compare changes over time, such as early enamel breakdown or edges of old fillings. Periapicals show the entire tooth and surrounding bone, including the thin ligament space around the root; they are useful for tooth pain, trauma, or after endodontic treatment to monitor healing. Occlusal images look across the floor of the mouth or the palate to find extra teeth, jaw fractures, or salivary stones. You bit a seed at lunch, and your dentist chose a periapical to check the root.
Extraoral pictures cover larger areas. A panoramic image sweeps around your head to map both jaws, jaw joints, and sinus outlines in one view. It is helpful for spotting missing or unerupted teeth and overall patterns in bone, though very small cavities may be missed because the detail is lower than close-up films. A cephalometric image is a side view of the skull used to assess jaw position and growth, and it often guides planning for treatments like Invisalign treatment. Together, these views show relationships that individual teeth images cannot.
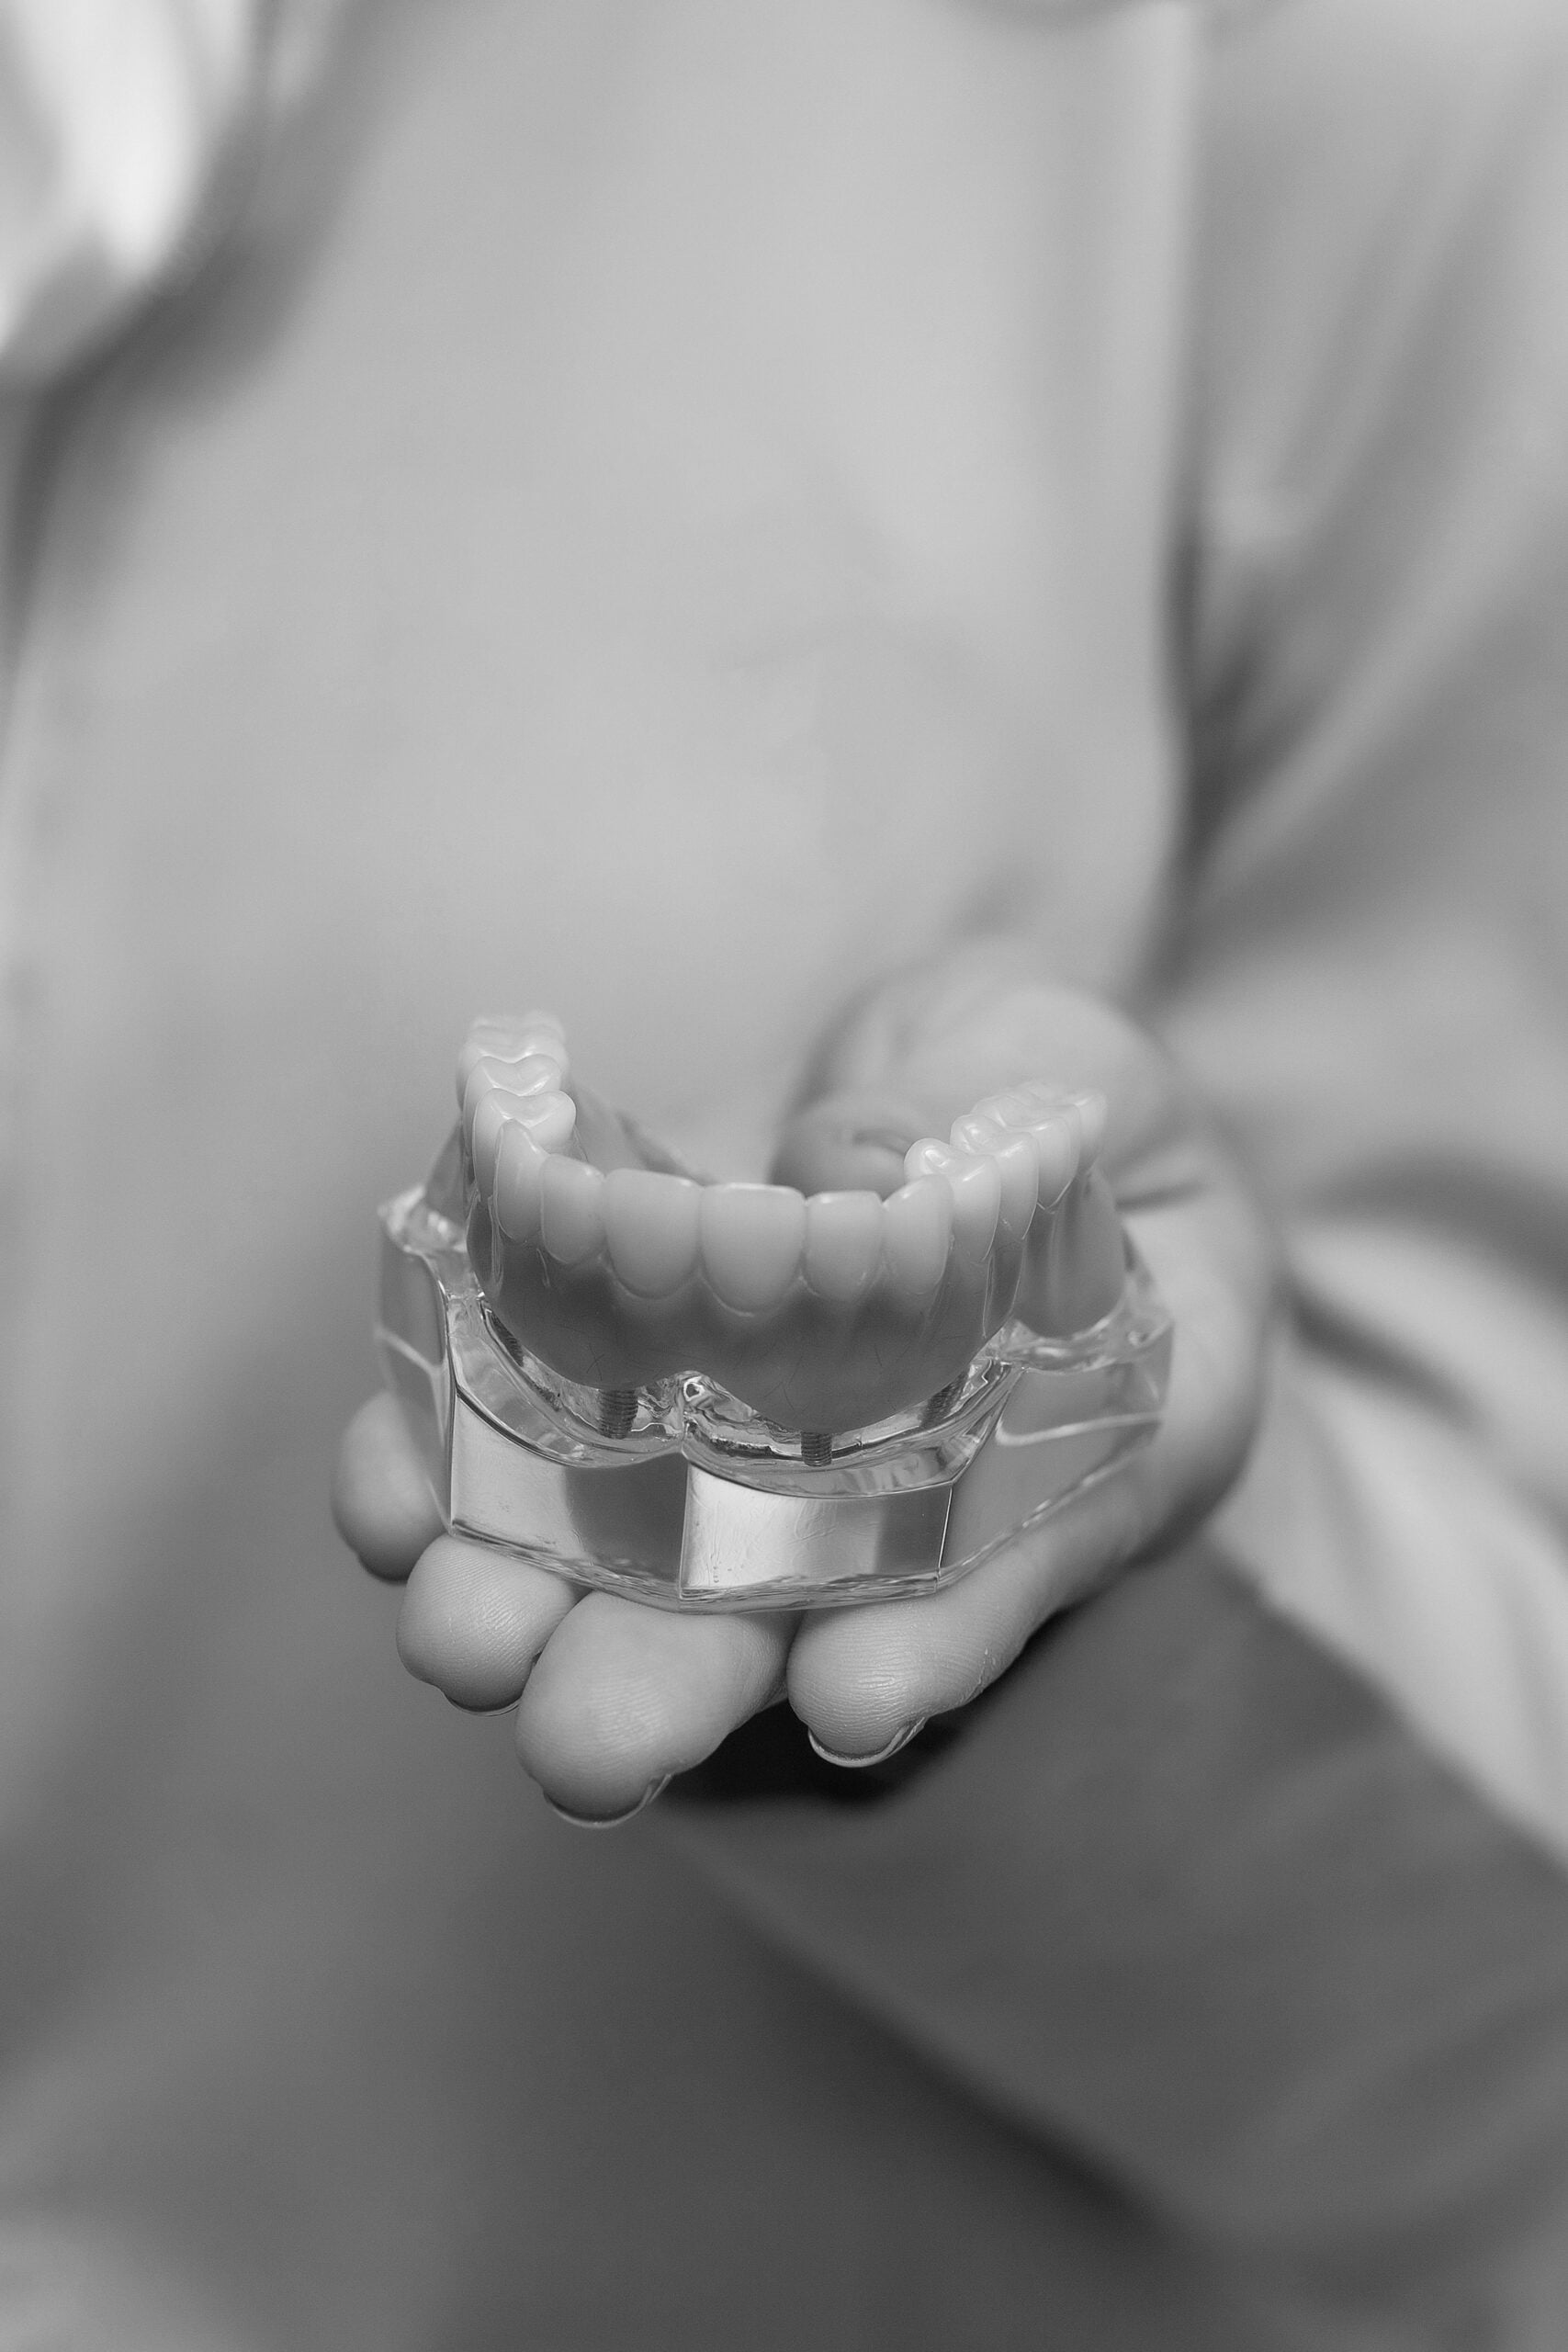
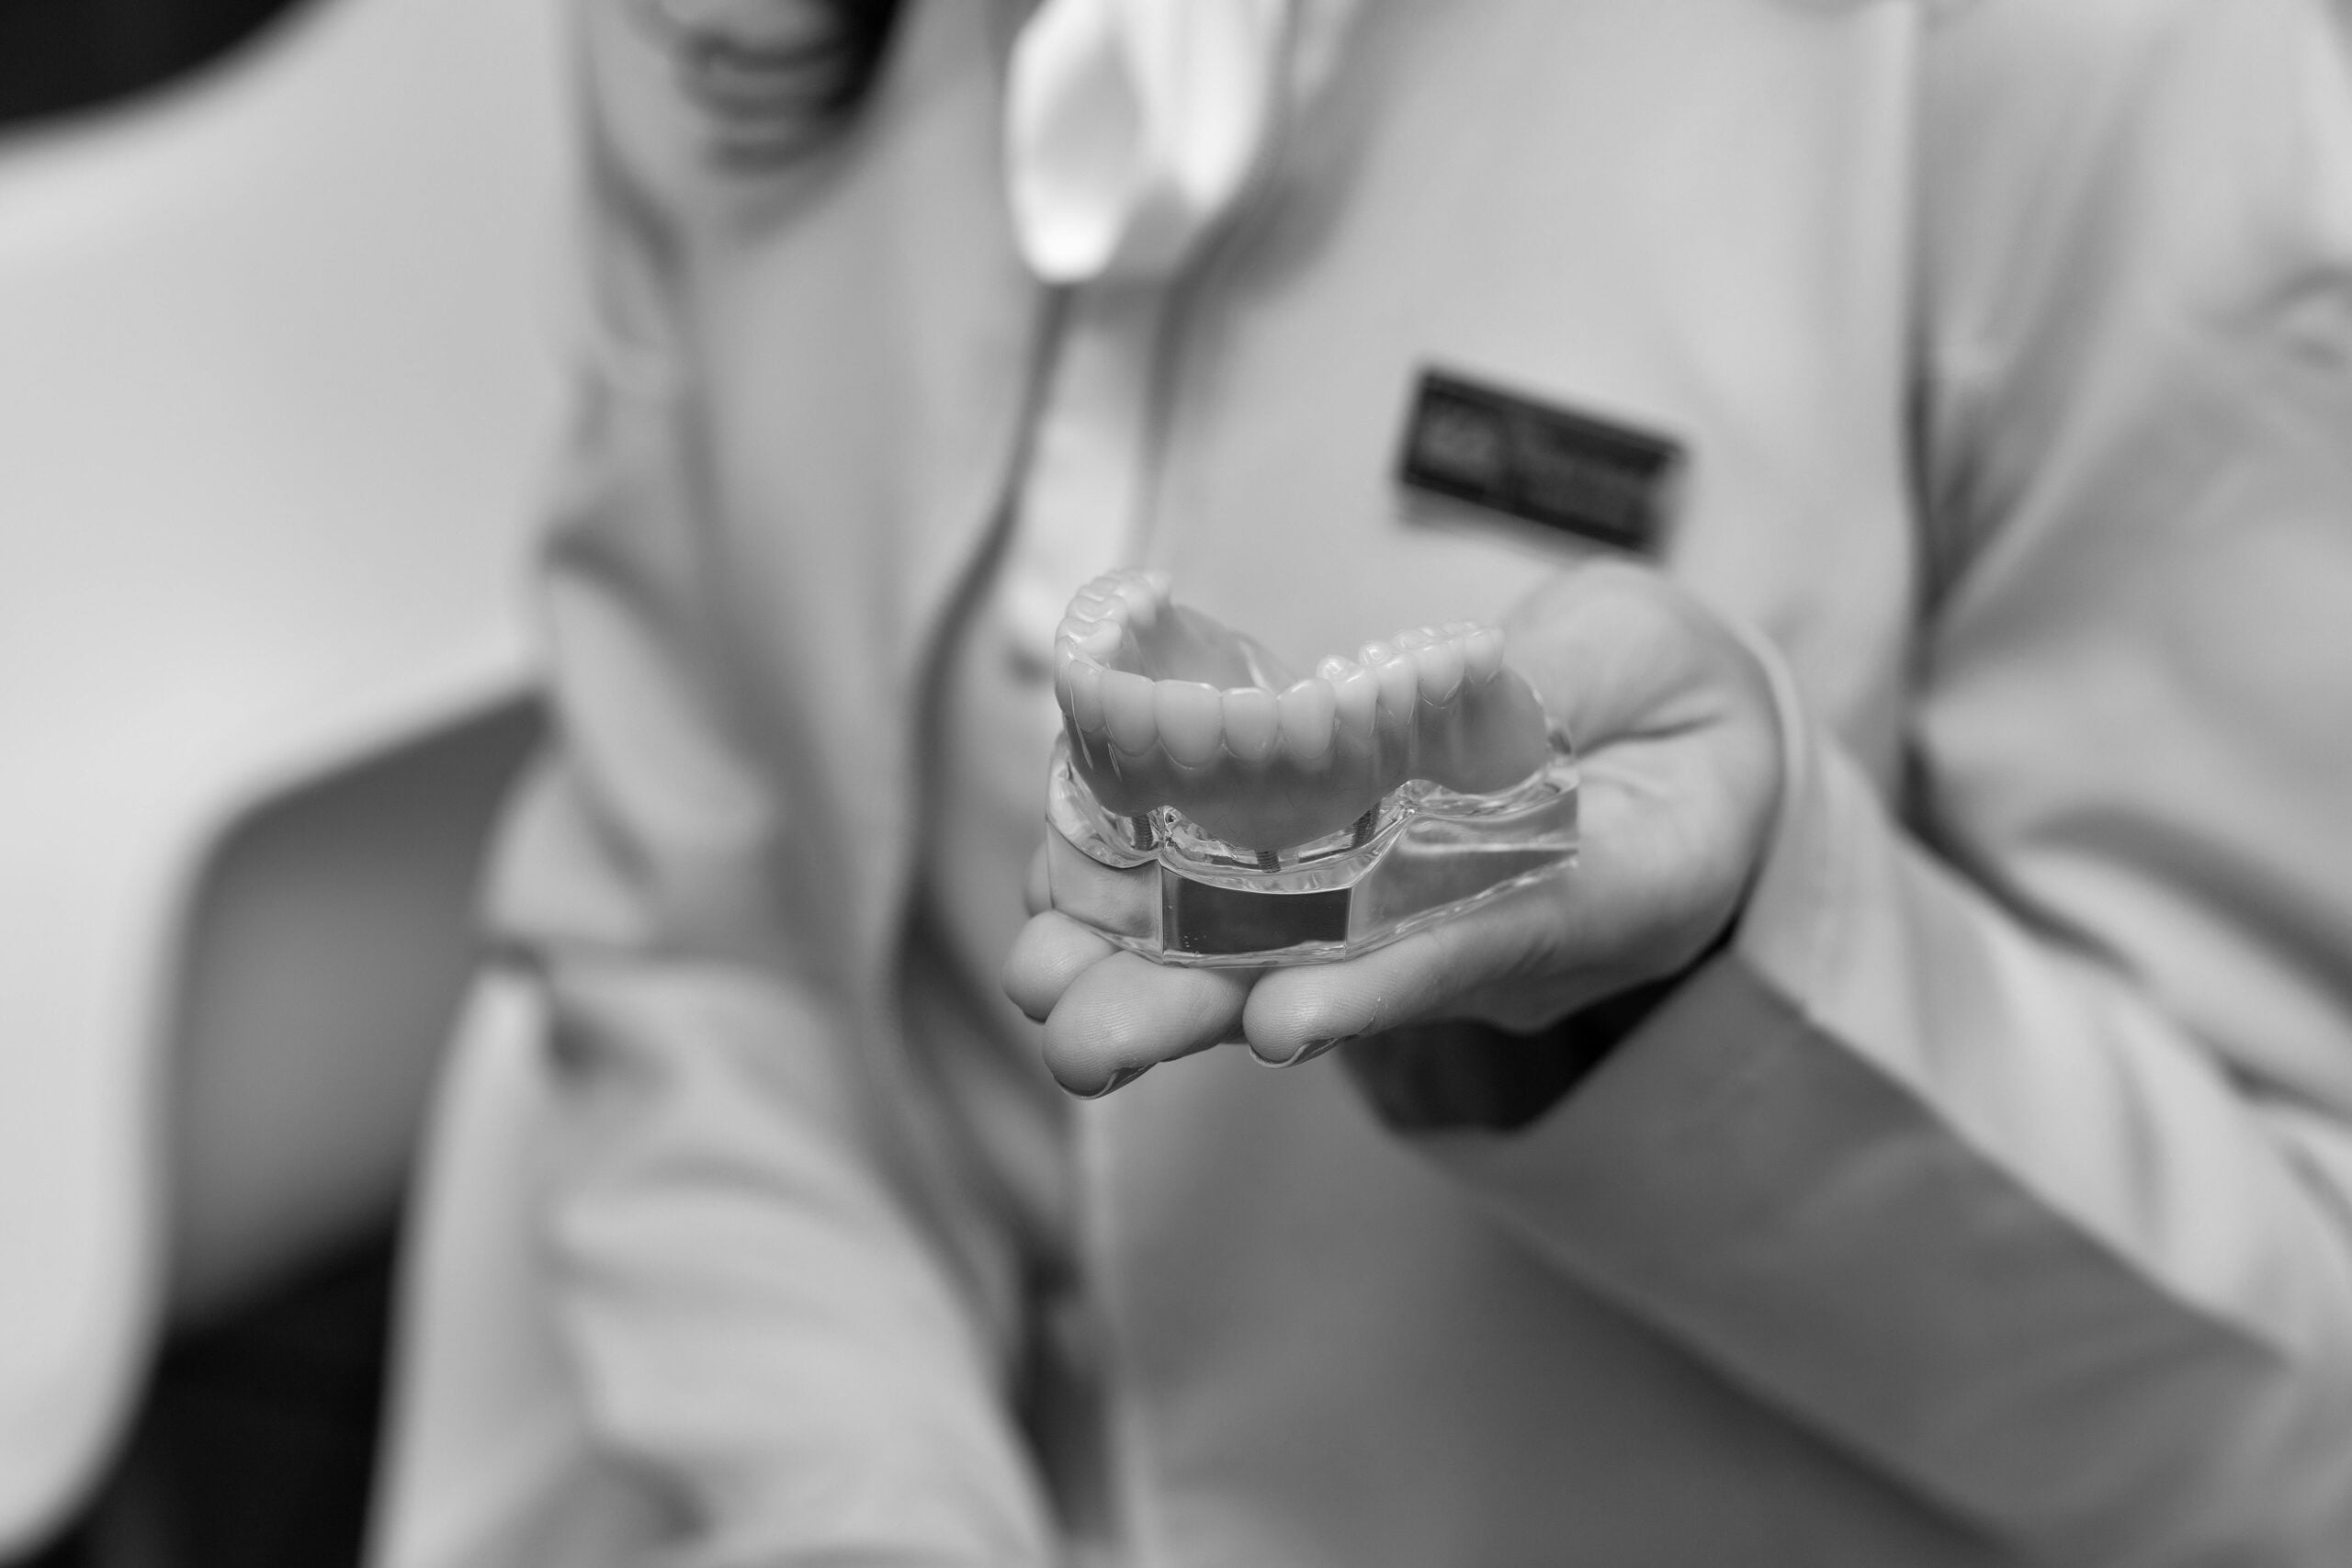
CBCT is a 3D scan that produces thin slices of the jaws. Small scans focus on a few teeth, while larger scans show the entire arch or both jaws. CBCT helps map nerve pathways, sinus shape, and bone thickness, which is important for implant planning and complex root anatomy. When planning extensive treatment, such as full arch implant dentures, 3D information improves safety and accuracy. Your dentist will match the image type to the question being asked so you get clear answers with appropriate detail. The right image answers the right question.
Common Findings in Dental X-Rays
Common findings in dental X-rays include cavities, changes in gum and bone support, root infections, and the position of unerupted or impacted teeth. X-rays also show existing dental work, such as fillings and crowns, and whether their edges fit well. Panoramic views can reveal sinus outlines and jaw joint shapes. Seeing patterns like these helps explain symptoms and plan care.
Cavities often appear as darker, wedge-shaped shadows between teeth on bitewings. Early enamel decay is small and confined; once it reaches dentin, the dark area grows and spreads under the enamel. Decay can also appear under old fillings, called recurrent caries, which looks like a new dark zone at the margin. Because X-rays flatten 3D structures into 2D, your dentist checks more than one view before deciding on treatment.
Bone and gum health show up as the height and shape of the bone between teeth. A healthy crest sits close to the necks of the teeth, with a thin, even outline. When periodontal disease is present, the bone height drops, either evenly across several teeth or in angular patterns next to one tooth. Hardened tartar can show as small, light flecks that match areas of bone loss. These signs guide cleanings, home care coaching, and timing of rechecks.
You feel a sharp catch on floss; a bitewing shows a filling overhang. X-rays commonly reveal open margins, gaps, or overhangs on restorations, which can trap plaque and irritate gums. They also show crowns, root canal fillings, and posts, making it easier to judge fit and monitor the roots of restored teeth. When a tooth needs structural repair, information from X-rays supports planning for crowns and bridges.
Other routine findings include small dark halos at root tips, which may indicate a past or current nerve problem, and brighter areas of sclerotic bone, which reflect the bone’s response to stress. Panoramic images often reveal impacted wisdom teeth, extra teeth, and sinus lining thickening. Missing teeth and the shape of remaining roots help in discussing options like partial dentures to replace gaps. If you want to learn how to read dental x rays, start by noting these common patterns, then ask how they match your symptoms. Clear patterns lead to clear decisions.
Spotting Cavities and Decay
Cavities show up on X-rays as darker areas because weakened tooth structure lets more X-rays pass through. On bitewings, decay often appears between teeth; on periapicals, it can show under old fillings or near the roots. Dark zones at the edges of fillings can suggest recurrent decay. Not every dark area is a cavity, so shape, location, and context matter.
You feel a zing with cold water and notice a shadow on your bitewing. Early cavities in enamel often look like a small notch just under the contact point between teeth. When decay reaches dentin, the dark area widens and spreads along the enamel-dentin junction, which can undermine the outer enamel. Occlusal, or chewing-surface, decay may be hard to see until it is deeper, so dentists compare X-rays with what they see and feel during an exam. Root decay, more common if gums have receded, appears as a scooped-out dark area near the neck of the tooth.
Several look-alikes can confuse the picture. Cervical burnout is a normal dark zone near the gumline that fades gradually and lacks the sharp borders of true decay. Overlapping contacts from an angled X-ray can hide or mimic cavities, so a repeat image with better alignment may be needed. Metal fillings, crowns, and dense materials look very bright and can mask decay at their edges, which is why dentists check margins closely. If you want to learn how to read dental x rays, focus on the lesion’s location, border, and symmetry rather than darkness alone.
X-rays tend to underestimate the true size of cavities, since they compress 3D structures into a 2D image. Dentists pair the image with a visual exam, gentle probing, and sometimes a cold test to judge depth. Early, surface-limited spots may be monitored with home care guidance and periodic images, while deeper lesions usually need treatment to stop progression. Understanding what these shadows mean helps you ask better questions and choose timely, conservative care. Small changes caught early are easier to manage.
Identifying Gum Disease Indicators
On dental X-rays, gum disease shows as changes in the bone that supports teeth. Look for lowered bone height between teeth, uneven or angled bone edges, and small bright flecks that suggest hardened tartar. You may also see dark areas where roots divide, called furcations, on back teeth. These patterns help your dentist judge severity and plan care.
Gums themselves do not show on X-rays, so early gingivitis can look normal even if they bleed when brushed. As inflammation persists, the bone crest that normally sits near the necks of teeth drops. Bitewing images are best for checking this bone level, since they capture the tops of back teeth and the bone between them with a consistent angle. A periapical view adds root detail, which helps spot furcation involvement and deeper defects. You notice sore gums after flossing, and your bitewing shows a thin, sloping bone crest.
Bone loss comes in two main patterns. Horizontal loss is a smooth, even drop across several teeth, while vertical loss creates angular defects next to one tooth. Small, bright ledges on the sides of teeth can be calculus, which often matches nearby bone loss. Dentists also check the thin ligament space around each root and the white border next to it, called the lamina dura; widening or irregularity can suggest active stress or inflammation. They measure the distance from the enamel-cementum junction to the bone crest to estimate attachment loss over time.
These signs matter because less bone means less support. A worsening crown-to-root ratio on X-rays signals reduced stability, especially on teeth with short or tapered roots. In back molars, furcation darkening suggests cleaning is harder and infection can spread more quickly. Remember that X-rays show hard tissues, so pocket depths and bleeding are confirmed with a gentle probe during your exam. If you want to learn how to read dental x rays, start by tracing the bone edge, compare both sides, then note tartar and furcations.
Used together with a clinical exam, X-rays make gum problems visible and trackable. Small changes found early are easier to manage.
Recognizing Bone Loss in X-Rays
Bone loss shows on dental X-rays as a lowered, uneven bone line around teeth. In a healthy image, the bone crest sits close to the necks of the teeth and looks thin and smooth. When gum disease is active, that crest moves downward and may slope or form angular defects. You notice food trapping between two molars and wonder what it means.
Start by finding the enamel-cementum junction, the thin line near the tooth neck. In most healthy areas, the bone crest lies about 1 to 2 millimeters below this point. A bigger gap suggests loss of support. Bitewing images best show these bone levels between back teeth with minimal distortion. Periapical images add root detail and help you see changes where roots split in molars, called furcations, which appear as darker zones where bone should be.
Patterns matter. Horizontal bone loss is a smooth drop across several teeth, while vertical loss creates a steep, angular dip next to one tooth. Small bright flecks on the side of a tooth can be calculus, which often sits next to bone loss. Dentists also look at the thin ligament space around the root and the white border next to it. A widened space or a broken white border can suggest inflammation or extra bite stress.
Keep in mind that X-rays are 2D pictures of 3D structures. Early gum inflammation may look normal, and beam angle or overlapping contacts can hide or mimic problems. This is why your dentist pairs images with gentle probing and checks from more than one view. If you want to learn how to read dental x rays, look for consistency: measure from the same landmarks, compare side to side, then match what you see with your symptoms.
Bone loss matters because less bone means less stability and a worse crown-to-root ratio. Caught early, cleanings and home care can slow or stop changes. Advanced loss may require specialty periodontal treatment, and in cases with missing teeth, options like snap-in implant dentures can restore function after gum disease is controlled. Small changes found early are easier to manage.
Understanding Dental X-Ray Terminology
Dental X-ray terminology describes what you see on the image and how it relates to teeth and bone. Learning a few key words helps you follow your dentist’s explanation and ask better questions. If you want to know how to read dental x rays, a clear vocabulary is the best starting point.
You open your patient portal and see words like radiolucent and radiopaque. Radiolucent means darker on the image, such as air spaces, cavities, or the nerve space. Radiopaque means lighter, such as enamel, metal fillings, and dense bone. Tooth-colored composites can look similar to dentin, which makes the edges more subtle than metal; that is why dentists check margins closely after tooth-colored dental bonding. Terms like artifact, overlap, cone cut, and motion blur describe technical issues that can hide details and sometimes require a retake.
Tooth anatomy terms guide orientation. The crown is the visible part above the gum, and the root ends at the apex, or tip. Inside, the pulp chamber and root canal space are the darker channels that hold the nerve and blood supply. Around each root is the thin periodontal ligament space, a dark line bordered by the lamina dura, a thin white line of bone. A break in the lamina dura or a round dark area near the apex is often called a periapical radiolucency, and it can suggest irritation or infection that needs clinical testing.
Caries terminology describes decay patterns. Incipient caries is a small, early lesion in enamel, while recurrent caries appears at the edge of an existing filling or crown. An open margin means a small gap at a restoration edge, which can trap plaque. Cervical burnout is a normal, diffuse darkening near the neck of the tooth, not a cavity. Ceramics, such as those used for custom porcelain veneers, are usually lighter than natural dentin, which helps outline their fit on X-rays.
When you recognize these terms, the image becomes a map instead of a mystery. In the next section, you can use this vocabulary to follow real examples and patterns. Clear terms lead to clearer decisions.
How X-Rays Aid in Diagnosis
Dental X-rays help dentists see problems that are hidden from the eye. They reveal cavities between teeth, infections at root tips, bone loss from gum disease, and the position of teeth and roots. Together with an exam, X-rays turn symptoms into a clear diagnosis and guide safe, timely care.
You wake with a toothache, but the tooth looks normal in the mirror. A focused periapical X-ray can show a dark area at the root tip that suggests a nerve infection, or a missed crack, while a bitewing can reveal a deep cavity tucked between teeth. These images change treatment from guesswork to targeted care, such as repairing a hidden cavity or treating an infected nerve. They also help confirm that pain is coming from the right tooth.
Beyond single teeth, X-rays map the bone that supports your smile. Bitewings show bone height between back teeth with a consistent angle, which makes changes over time easier to spot. Periapical images add root detail, helping identify furcation involvement and localized defects. By comparing today’s image to a past one, dentists can see whether bone levels are stable, improving, or worsening, then tailor cleanings and follow-ups.
Panoramic and 3D views answer bigger questions. A panoramic image outlines both jaws, sinus spaces, and unerupted or impacted teeth, which helps plan extractions and assess overall dental development. When precise detail is needed, a limited-field 3D scan can map nerve paths, sinus shape, and root anatomy, which improves safety during complex procedures and helps evaluate trauma or atypical tooth shapes. These broader views complement the close-up films, not replace them.
Every image has limits, since X-rays are 2D pictures of 3D structures. Very early decay or small cracks can be subtle, and beam angle can hide or mimic problems. This is why dentists pair images with a visual exam, gentle tests, and your story. If you want to learn how to read dental x rays, focus on patterns that match symptoms and watch for changes across time. Clear pictures lead to clear decisions.
Questions to Ask Your Dentist
Ask your dentist what each X-ray shows, why it was taken, and what is normal versus concerning. Request a simple summary: what needs attention now, what can be watched, and what the next step is. Also ask how today’s images compare with your last set.
At your checkup, a bitewing shows a shadow between two molars. Start by asking which tooth is affected, whether the dark area is in enamel or dentin, and how that changes treatment. Clarify if a new image or a different view would improve certainty. If you want to learn how to read dental x rays, ask your dentist to point out landmarks and trace edges with the cursor while you watch.
For gums and bone, ask where the bone crest sits now and how it has changed over time. Request a side‑by‑side comparison with any previous images, and ask what home care or cleanings could slow changes. If a filling edge looks uneven, ask if it is an overhang, an open margin, or simply overlap from the X-ray angle, and whether a focused periapical or a retake would clarify the picture. These questions turn abstract shadows into clear, actionable information.
Discuss safety and comfort. Ask about radiation dose for each view, how exposure is minimized, and why a particular image was chosen for you. If gagging or anxiety makes X-rays difficult, ask about gentle oral sedation options and tips for positioning. If you might be pregnant, tell your dentist, and ask whether images can be delayed or adapted. For planning your visit, check our current hours.
Close by asking for a plain‑language summary and what signs should prompt a call before your next visit. Bringing a short list keeps the conversation focused and helps you leave with a clear plan. Good questions lead to better care.
Limitations of Dental X-Rays
Dental X-rays are helpful, but they cannot show everything. They are two-dimensional pictures of three-dimensional teeth and bone, so details can overlap or hide each other. Very early decay and tiny cracks may not be visible. X-rays also do not show gums, nerves, or pain, so they must be paired with an exam.
You see a faint shadow on a bitewing and worry it is a cavity. Because X-rays compress depth, enamel, dentin, fillings, and bone can stack and create confusing patterns. Overlapping contacts can hide decay, and a normal effect called cervical burnout near the neck of a tooth can mimic a cavity. Metal fillings and crowns look very bright and can mask decay at their edges. X-rays often underestimate how large a cavity truly is, so dentists use findings from several angles and clinical tests before deciding on treatment.
Each image type has limits. Bitewings are best for checking bone height and cavities between back teeth, but poor angulation can blur or overlap contacts. Periapical views show roots and surrounding bone well, yet small chewing-surface cavities can be missed. Panoramic images cover both jaws, but fine detail is lower, so tiny lesions are easy to overlook. 3D CBCT scans show slices through the jaw, which helps with complex roots and implants, but they are not routine for finding small cavities and can be distorted by metal scatter. None of these views reliably shows soft tissues, and hairline cracks may only be suggested by indirect signs.
These limits shape how dentists work. They may retake a picture with a better angle, add a different view, or use simple tests like a cold stimulus or a gentle probe to confirm what a shadow means. Comparing today’s image with an older one helps reveal true change over time. If you want to learn how to read dental x rays, remember they are one part of the story, not the whole story. Clear images matched with symptoms lead to better decisions.
The Importance of Regular X-Rays
Regular dental X-rays matter because they show changes that eyes and mirrors cannot see. They help catch problems early, when care is simpler and less invasive. The schedule is based on your risk, not a fixed calendar, so intervals may be shorter or longer over time. A good baseline, followed by periodic updates, lets small shifts become visible.
You feel fine, yet a routine bitewing finds a hidden cavity. X-rays can reveal decay between teeth, infections near root tips, bone changes from gum disease, and issues under old fillings or crowns. Early detection often means a small repair instead of a larger procedure later. When images are taken at consistent, risk-based intervals, comparisons are clearer and trends are easier to trust.
Regular X-rays also guide decisions beyond cavities. They show whether bone support is stable, improving, or worsening, which shapes home care and cleaning plans. For growing patients, periodic images confirm that adult teeth are moving into place and that wisdom teeth are not blocking neighbors. For adults with a history of decay, dry mouth, or complex dental work, closer intervals may be helpful because problems progress faster in these settings. After treatment, follow-up images help confirm healing at root tips, check the fit of new restorations at their edges, and make sure no new issues are starting nearby.
Safety is built into the process. Dentists choose the fewest images needed to answer the clinical question, place shields when appropriate, and use modern digital sensors that keep exposure low. Just as important, they select the right view for the job, so you get information without unnecessary repeats. If you want to learn how to read dental x rays, focus on how today’s image compares with your last one and ask what changed.
Regular, risk-based X-rays turn silent problems into clear, timely decisions. Early pictures, early answers.
Preparing for Your Dental X-Ray
Preparation is simple. Tell your dentist about any health changes, possible pregnancy, and recent dental X-rays. Brush before your visit so food debris does not hide details. Remove removable appliances and metal accessories when asked to reduce shadows on the image.
You arrive for a checkup and want quick, clear pictures. Bring a short symptom list, like cold sensitivity on a top molar or biting pain on a lower premolar, so the team can choose the right views. If you have past X-rays from another office, ask for digital copies ahead of time. Sharing prior images avoids repeats and helps your dentist compare changes over time.
What you wear can matter. For panoramic or 3D scans, remove earrings, nose rings, necklaces, glasses, and bulky hair clips, since metal and thick plastic can create streaks or block anatomy. For intraoral images, you will bite gently on a small tab or sensor. Breathe through your nose, keep the tongue relaxed, and follow simple positioning cues. For a panoramic image, stand tall, rest lightly on the bite guide, press your tongue to the roof of your mouth, and hold still as the unit moves.
Comfort is part of preparation. If you gag easily, tell the team before starting. They can use smaller sensors, topical gel, salt on the tongue, or a different angle. Short breaks and slow nasal breathing help. For children, a quick practice with an empty sensor and a clear countdown builds confidence. Limited mouth opening, braces, or a strong bite can be managed by adjusting position and choosing a different view, so speak up about anything that feels difficult.
Safety is built in. Your dentist selects the fewest, most useful images to answer the clinical question and places protective shields when appropriate. Clear instructions and steady positioning reduce the need for retakes, which keeps exposure low and results sharp. If you want to learn how to read dental x rays, good preparation gives you cleaner pictures and easier patterns to follow. Small steps lead to clearer images.
Frequently Asked Questions
Here are quick answers to common questions people have about How to Read Your Dental X-Rays in Glendale, AZ.
- What should I look for first when reading a dental X-ray?
When reading a dental X-ray, first identify its type, such as bitewing, periapical, or panoramic. Next, locate orientation markers and compare both sides for symmetry. Look for white areas indicating dense structures like enamel and fillings, and darker areas for less dense structures. Black triangles or shadows between teeth may suggest cavities, and a dark halo at the root tips could indicate a root infection. This basic approach helps understand what the X-ray reveals.
- How do dental X-rays detect cavities?
Cavities appear as darker areas on dental X-rays because decay creates less dense structures that allow more X-rays to pass through. On bitewings, cavities often show up as shadows between teeth, while on periapicals, they might appear near fillings or roots. However, not every dark spot is a cavity; its shape, location, and surrounding structures matter. Dentists use these clues to identify cavities and decide on treatment.
- What signs of gum disease can be seen in dental X-rays?
Dental X-rays can reveal gum disease by showing changes in the bone that supports the teeth. Look for lowered bone height, uneven or sloping bone edges, and small bright spots indicating tartar. Dark areas in the spaces where the roots divide, known as furcations, may also be visible in the back teeth. These signs help dentists assess the extent of gum disease and guide treatment plans.
- Are dental X-rays safe?
Dental X-rays are considered safe because they use very low doses of radiation. Dentists follow the ALARA principle, meaning they aim to keep radiation “As Low As Reasonably Achievable” while still obtaining necessary diagnostic images. Protective measures such as lead aprons and thyroid shields help to minimize exposure further. Safety protocols ensure the benefits of taking X-rays outweigh any potential risks.
- How often should dental X-rays be taken?
The frequency of dental X-rays depends on individual risk factors and not a fixed schedule. Children, individuals with existing dental issues, or those at higher risk for cavities may require more frequent X-rays than adults with healthy teeth and gums. During routine checkups, your dentist will determine the appropriate interval for X-rays to help ensure any potential issues are detected and treated early.