
Introduction to PMMA in Dentistry
Polymethyl methacrylate, or PMMA, is a strong, polishable acrylic used widely in dentistry. It is most often chosen for temporary crowns, bridges, and full-arch prototypes that patients wear while final restorations are planned. PMMA is gentle to oral tissues, easy to adjust, and can be repaired chairside. In full-arch care, it helps test bite, speech, and appearance before committing to the definitive prosthesis.
Picture this: after implant surgery, a patient leaves the same day with a smooth PMMA provisional. Modern PMMA temporaries are often made with CAD/CAM milling from dense, pre-polymerized blocks. This process reduces internal porosity, which can improve strength and wear compared with conventionally processed or printed resins [1]. In vitro comparisons also report that milled PMMA tends to show lower surface roughness and higher hardness than some printed variants, which supports better polish and stain resistance in service [2]. These material differences matter because a smoother, stronger provisional is more comfortable and easier to keep clean.
Clinically, PMMA prototypes protect healing tissues and implants, and they guide occlusion, lip support, and phonetics. They are adjustable, so small changes in length or bite can be made quickly, then re-evaluated at follow-up. Digital planning helps here, since a milled PMMA can be duplicated or refined with the same design files. Over time, digital full-arch protocols have shown marginal bone level changes that are comparable to analog methods in retrospective studies, supporting their use when executed carefully [3]. For patients exploring fixed full-arch implant treatment, such as the All-on-4 full-arch approach, PMMA temporaries provide a safe, testable bridge to the final result.
In my full arch pmma temporaries workflow, PMMA serves as the trial stage where function and esthetics are proven before the definitive restoration is fabricated. This keeps care predictable for the team and understandable for the patient. Reliable temporaries make better finals.
Understanding the Full-Arch Workflow
The full-arch workflow is a stepwise plan to replace all teeth in a jaw with a coordinated, fixed solution. It starts with careful records, then surgery, a PMMA prototype, and finally the definitive restoration. Morning of surgery, a patient arrives anxious yet hopeful. Each stage has clear goals, so decisions build safely on the last.
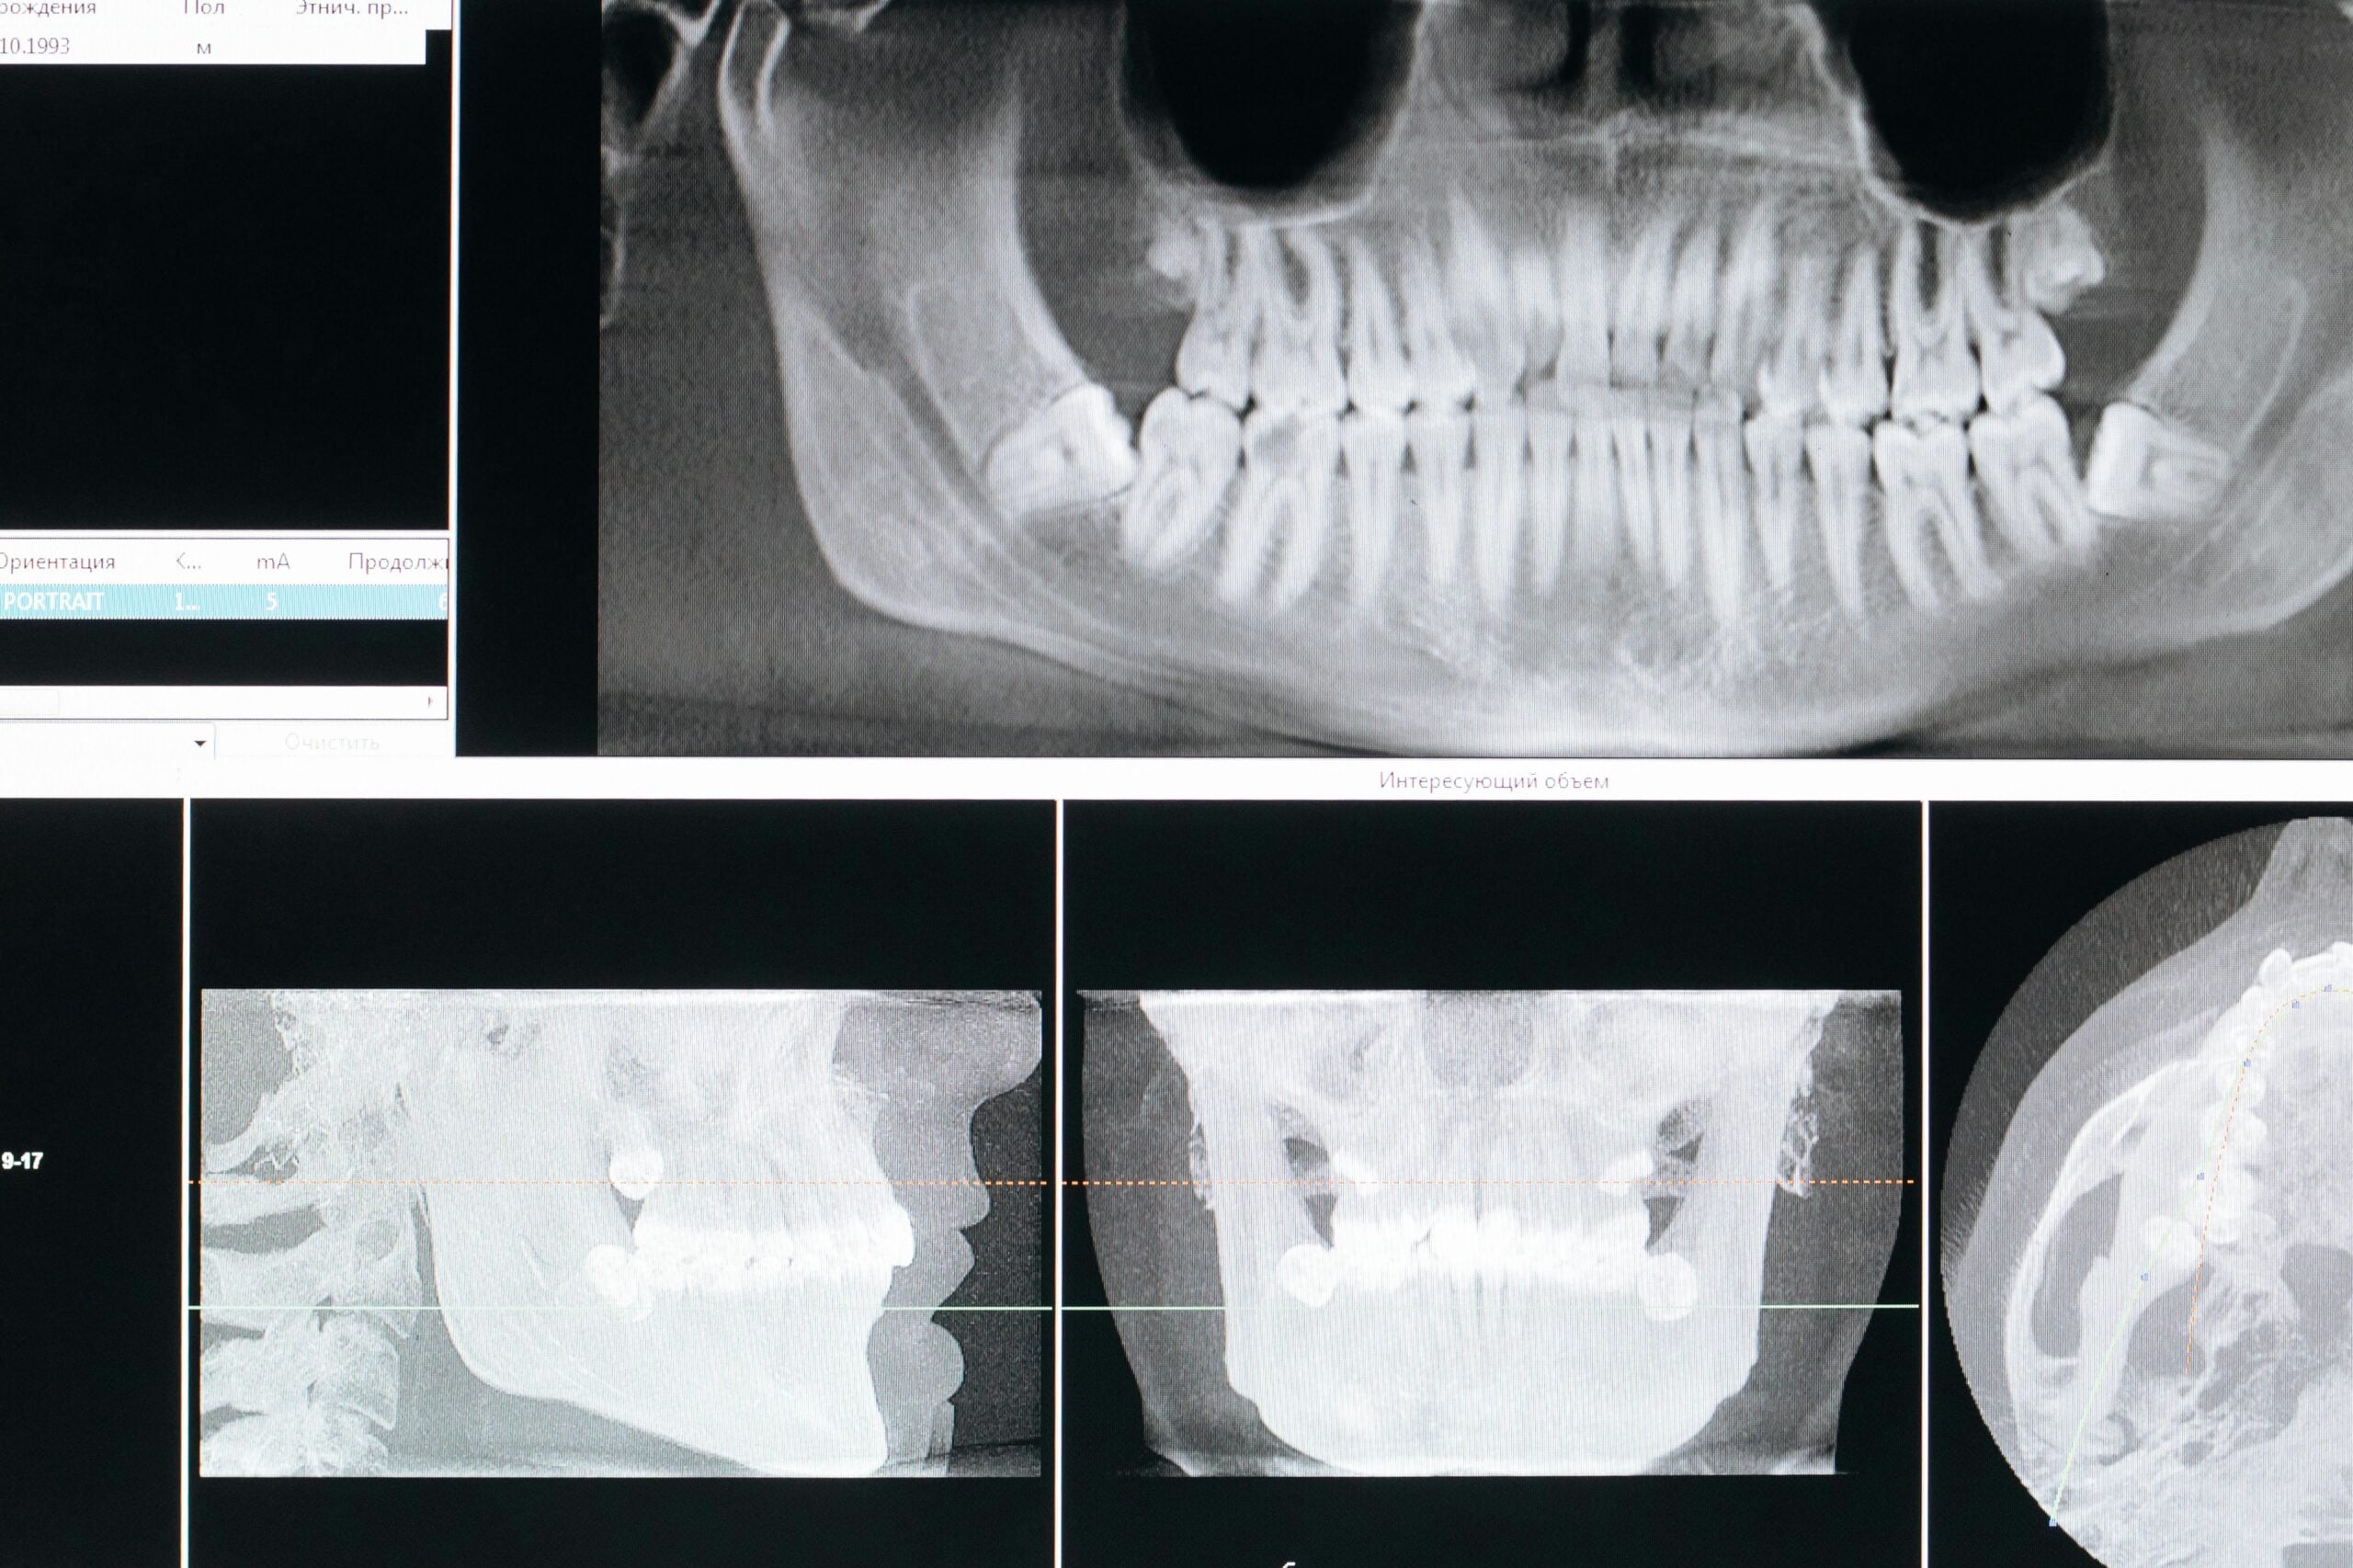
We begin with diagnosis and planning. Photographs, scans, and bite records map facial support, tooth display, and jaw position. Digital design helps set tooth size, midline, and vertical dimension before surgery. This planning reduces guesswork and lets the team prepare a provisional that matches the design. Current protocols use digital planning and CAD/CAM fabrication for both provisionals and finals, and material and milling choices affect strength and maintenance [4].
At surgery, implants are placed and a PMMA prototype is delivered the same day or shortly after. The goal is a smooth, cleanable provisional that supports speech, lip profile, and bite while tissues heal. Early follow-ups focus on pressure spots, bite contacts, and hygiene coaching, then small refinements guide the final. In my practice, I organize the full arch pmma temporaries workflow into repeatable steps that reduce surprises:
- Records and digital design based on facial and functional goals
- Guided or verified implant placement with stable multi-unit platforms
- Delivery of a PMMA full-arch prototype with balanced occlusion
- Short-interval checks for comfort, speech, and cleaning access
- Targeted adjustments to length, contour, or bite as needed
- Final restoration fabrication that copies proven contours and contacts
For patients, this sequence means fewer surprises and clearer choices. If a removable path fits health or lifestyle better, a treatment plan can pivot to options like snap-in implant dentures. The PMMA phase acts as a test drive, so what works in daily life is carried into the final. Done carefully, the process stays calm and predictable.
Step 1: Designing the PMMA Prototype
Designing the PMMA prototype is the plan for the temporary full-arch you will wear early in treatment. We choose tooth position, bite, and smile display, then shape the base so it is smooth and easy to clean. The aim is a comfortable, sturdy bridge that protects healing tissues while we prove function and esthetics.
We start with photos, scans, and bite records to capture how your lips move and how your jaws meet. A patient counts “sixty to seventy” while we preview edge position and speech. Using these records, I set the midline, incisal length at rest and smile, and a vertical dimension that supports the lower face. The occlusion is designed for light, even contacts in centric and freedom in excursions to reduce stress on new implants. Screw access is planned through occlusal or lingual surfaces, kept away from incisal edges for strength and appearance.
Next, I contour the intaglio to be convex and polished, which helps the gums stay healthy and allows easy hygiene with brushes and water flossers. Embrasures are opened enough for cleaning, yet shaped to keep food from packing. Cantilever length is limited based on implant position, and the arch form is kept broad enough for tongue space and clear speech. If lip support needs help, flange thickness is adjusted carefully until the profile looks natural.
Once the digital setup is approved, the design is sent for milling in PMMA and indexed so we can duplicate or revise it later. Delivery day focuses on pressure marks, clear “s” and “f” sounds, and quiet chewing contacts, then small adjustments are recorded back into the design for the final. In my full arch pmma temporaries workflow, this design step is the map that keeps the process predictable. Thoughtful planning here makes the try-in calm and the next step smoother.
Step 2: Try-In Phase
The try-in phase is where the milled PMMA prototype meets the mouth and the plan meets real life. We verify fit on the implants, adjust the bite, and check speech and appearance. You share what feels right or off, and we fine-tune until daily function is smooth. This step confirms what will be copied to the final restoration.
We begin by seating the PMMA prototype gently and confirming passive fit on the multi-unit abutments. Any pressure spots on the gums are marked and relieved, then repolished so the surface stays smooth. Once seated fully, we check screw access, tighten in a cross pattern, and confirm stability. This sets a calm base for accurate bite adjustments.
Next, we refine occlusion. Light, even contacts are set in your normal closing position, and heavy points are removed until chewing feels quiet and centered. Working and non-working interferences are reduced, especially near any cantilevers, to lower stress on the implants. In excursions, we create smooth guidance with a bit of freedom so the jaw can glide without chatter. At the mirror, a patient says, “my S sounds feel sharp.” That cue prompts us to adjust incisal length or palatal contours for clear “s,” “f,” and “v” sounds.
Esthetics are checked with you sitting upright. We assess tooth display at rest, smile line, and midline, then adjust lengths or angles in small steps. Lip support is evaluated, and the flange or cervical contours are shaped so the profile looks natural. We also confirm hygiene access by keeping the intaglio convex and the embrasures open enough for brushes and water flossers. All changes are polished to a high shine to resist plaque and stains.
When comfort, bite, speech, and appearance are approved, we lock it in. Photos and intraoral scans capture the adjusted prototype, along with a bite record, so the lab can duplicate these proven contours. In my full arch pmma temporaries workflow, this try-in turns preferences into precise instructions for the definitive restoration. Small, thoughtful changes here prevent big surprises later.
Step 3: Refinement Techniques
Refinement is the focused phase where we tune the PMMA prototype so it feels natural and works quietly. We adjust bite contacts, contour surfaces for speech and hygiene, and repair small chips if they appear. At a one-week visit, a patient says chewing feels uneven on the left. That cue guides precise, small changes that make daily use easy.
Occlusion often settles as tissues relax and screws are rechecked, so we verify contacts at each visit. Light, even stops in your normal close are maintained, and any heavy points are relieved in small steps. We smooth working and non-working interferences so the jaw glides without chatter, especially around cantilevers. After each adjustment, the surface is repolished to a high shine so it stays comfortable and resists stain.
Next, we fine-tune contours that affect comfort and cleaning. The intaglio is shaped to a gentle, convex form, which helps the gums stay healthy and allows easy access for brushes and water flossers. Embrasures are opened just enough to prevent food trapping while protecting speech. If “s,” “f,” or “v” sounds are dull or sharp, we adjust palatal contours or incisal edges in tiny increments until words feel natural. Lip support is checked upright, then flange or cervical thickness is refined so the profile looks relaxed and balanced.
Small defects can appear as you test the prosthesis in real life. Minor chips at edges are repaired chairside with compatible resin, then blended and polished. Thin areas are thickened where needed to reduce flex, and internal corners are rounded to lower stress. Screw access fills are reshaped flush with the occlusal table so marks read cleanly during future bite checks. Each change is conservative, then verified by feel, sound, and clean contact patterns.
When the prototype feels right across meals and conversations, we capture it. Photos, scans, and a fresh bite record document the refined contours so the lab can copy them into the final restoration. In my full arch pmma temporaries workflow, refinement translates real-world feedback into exact design details for the next step. For visit planning, check our current hours. Thoughtful refinements now prevent bigger changes later.
Material Considerations for PMMA
PMMA for full-arch prototypes must balance strength, polish, and cleanability while tissues heal. The key choices are material processing, thickness, and surface finish, because these control how the prosthesis wears, resists fracture, and stays hygienic. Picture this: at two weeks, tea stains show near the canine; polish and contour choices decide how easily they wipe away. In my full arch pmma temporaries workflow, I select and shape PMMA to make daily use simple and safe.
Thickness and geometry come first. Cross-sections should be robust around screws and connectors, with smooth internal angles to reduce stress. Cantilevers are kept short, and occlusal tables are broad enough for stability without adding bulk that traps food. These details limit flex and chipping during chewing, especially early while bite and speech are still being refined.
Surface finish strongly affects plaque buildup and comfort. Processing route influences how the PMMA surface behaves with saliva, and milled, printed, and heat-polymerized resins can show different wettability in vitro, which is relevant to how easily a surface wets, cleans, and repolishes [5]. Biofilm, including Candida, can adhere to denture base resins in the lab, so a high-gloss, convex intaglio and accessible embrasures matter, along with sensible cleansing routines [6]. A smoother, less water-retentive surface tends to feel cleaner and stain less between recalls.
Processing choice also sets expectations for wear and repairs. Dense, pre-polymerized PMMA blocks milled by CAD/CAM provide consistent material that finishes to a high shine, while printed resins may need slightly more thickness and careful post-curing to reach target properties. Chairside repairs should be done with compatible resin, then fully finished and polished so adjustments do not create rough areas. Shade and translucency are selected to support lip profile and natural tooth display without distracting glare.
These material decisions keep the prototype comfortable while it proves function and esthetics. They also make later lab communication straightforward, since the final restoration can copy the successful contours and surface quality. Good material choices early make each next step quieter and more predictable.
Benefits of Using PMMA Temporaries
PMMA temporaries give you an immediate, stable smile that can be adjusted quickly as you heal. They protect implants and soft tissues, let us fine-tune bite and speech, and provide a safe “test drive” for looks and function before the final bridge. On day one, a patient leaves surgery speaking clearly and smiling. Because PMMA is smooth and polishable, it is comfortable and easy to keep clean during recovery.
These prototypes are lightweight and kind to healing gums, so daily activities feel normal sooner. The material accepts precise shaping, which helps us set lip support, tooth lengths, and contours without adding bulk. If a spot feels high or speech sounds sharp, we can reshape small areas in minutes, then repolish to a high shine. This keeps surfaces comfortable and reduces places where food might collect.
PMMA temporaries also make treatment predictable. We can refine occlusion step by step, creating quiet chewing and smooth jaw movements that lower stress on new implants. Because adjustments are easy to document, each change becomes a clear instruction for the lab. Digital records and scans of the approved prototype allow the final restoration to copy proven contacts and contours. In my full arch pmma temporaries workflow, this saves time, reduces remakes, and leads to a calmer delivery of the definitive bridge.
Another benefit is flexibility. If real-life use shows that a different tooth shape, shade, or flange thickness works better, we adapt the PMMA and confirm it over meals and conversations. Repairs are straightforward if minor chips occur, so you stay comfortable while we learn what works best for you. This phase also supports clear communication, since you can see and feel changes before they become permanent.
PMMA temporaries make healing smoother, adjustments simpler, and final results more predictable. Thoughtful provisionals lead to better finals.
Tips for a Successful Try-In
A successful try-in keeps the PMMA prototype comfortable, stable, and easy to adjust. First, confirm passive fit on the multi‑unit abutments, relieve any tissue pressure, and repolish so surfaces stay smooth. Then set light, even bite contacts, check speech, and review esthetics with the patient sitting upright. Finish by documenting approved changes so the lab can copy them accurately.
Start with a calm sequence. Seat the prosthesis gently without force, verify each interface, and tighten screws in a cross pattern to recommended torque. Mark any pressure areas with a disclosing medium, relieve conservatively, and bring the surface back to a high shine. This creates a stable base for occlusion, which should be refined only after full seating and stability are confirmed.
Next, shape the bite so chewing feels quiet and centered. Use thin and thick articulating papers, correct heavy points in centric first, and remove working and non‑working interferences in small steps. Avoid heavy contacts over cantilevers, and allow a touch of freedom in excursions so the jaw can glide smoothly. Recheck with the patient upright, since posture changes contact patterns. A patient says after lunch, “the left side feels high.” That cue directs you to re-check that quadrant before moving on.
Phonetics and esthetics follow. Test “s,” “f,” and “v” sounds; sharp or whistling “s” often means adjusting incisal length or palatal contours in tiny increments. Evaluate tooth display at rest and smile, refine midline and incisal plane if needed, and assess lip support from the profile. Keep the intaglio convex and embrasures accessible so cleaning tools pass easily, then polish every adjusted area to a glossy finish that resists plaque and stains.
Close by locking in what works. Take photos, an intraoral scan of the adjusted prosthesis, and a fresh bite record, then note torque values and any special contours to preserve. In my full arch pmma temporaries workflow, this disciplined sequence turns patient feedback into clear, repeatable lab instructions. Small, well-documented changes now prevent big surprises later.
Common Challenges and Solutions
Common PMMA prototype challenges include bite feel that changes, small chips, speech shifts, and areas that trap food. The solutions are simple: verify passive fit, make light even contacts, keep surfaces polished and convex, and schedule early checks. At dinner, a patient notices a sharp click on the right. That cue guides a focused, small adjustment that restores quiet chewing.
Fit and tissue comfort can change as swelling settles. We seat the prosthesis without force, confirm passivity on multi‑unit abutments, and relieve any pressure spots conservatively, then repolish so the surface stays smooth. If a side feels high, we first recheck screw stability in a cross pattern, then refine occlusion so centric stops are light and even. Removing small working and non‑working interferences reduces implant stress and makes chewing feel centered.
Fractures and chips tend to appear where material is thin or a cantilever is long. The fix is to thicken connectors, round internal corners to lower stress, and keep cantilevers short. Minor edge chips are repaired with compatible resin, then blended and polished to a high gloss. Screw access fills are kept flush with the occlusal table so marks read clearly during future bite checks. For heavy clenching, we reduce high spots and may advise protective habits to limit overload while healing.
Speech and appearance sometimes need fine tuning. Whistling or slurred “s” sounds often improve with tiny changes to incisal length or palatal contours. Lip support is adjusted by refining flange or cervical thickness until the profile looks relaxed and natural. Staining and plaque buildup are handled by maintaining a high‑shine polish, shaping a convex intaglio, and opening embrasures enough for cleaning tools. After any adjustment, we repolish fully so the surface feels slick and resists buildup.
Documenting what works turns fixes into a better final. Once comfort, bite, speech, and hygiene are stable, we capture photos, scans, and a bite record so the lab can copy proven contours. In my full arch pmma temporaries workflow, these small, steady solutions keep the prototype safe and the path to the final calm. Thoughtful maintenance now prevents bigger problems later.
Finalizing the Full-Arch Restoration
Finalizing the full-arch restoration means turning the proven PMMA prototype into the long-lasting bridge. We capture the approved bite, speech, and contours, select the final material, and deliver a precise, cleanable prosthesis. Before delivery, we confirm passive fit on multi-unit abutments, torque accurately, and polish every adjusted surface. At delivery, a patient bites gently and feels the same quiet contacts as the prototype.
We start by recording exactly what worked in the PMMA. Intraoral scans or precise models capture contours, screw access paths, and the verified bite. A fresh bite record and careful cross-mounting maintain vertical dimension and midline. The lab then duplicates those details in the definitive design, so contacts, embrasures, and lip support carry over without guesswork. Published digital protocols describe transferring adjusted provisionals directly into final prostheses by copy-milling or matching CAD files [7].
Material choice depends on habits, available space, and esthetic goals. Options include monolithic zirconia with stained or layered ceramics, ceramic over frameworks, or metal-acrylic “Toronto” style bridges. Limited restorative space can restrict porcelain layering and influence contour decisions. Each option has a unique maintenance profile, repair approach, and weight. Ten-year retrospective comparisons of ceramic and Toronto bridges highlight that complication patterns differ, which guides selection and patient counseling [8].
Before fabrication, we may confirm accuracy with a verification jig or a printed try-in when indicated. At delivery, we seat the final on clean multi-unit platforms, test passivity, and tighten in a cross pattern. A baseline radiograph confirms full seating of abutments and framework. Light, even contacts are set in your natural close, and any interferences are relieved in small steps. Screw access fills are finished flush, then occlusion, speech, and hygiene access are rechecked upright.
When the final matches your proven prototype, everyday use feels familiar from day one. In my full arch pmma temporaries workflow, this handoff keeps the process calm and predictable. Finalizing is really about copying success and making it durable. Copy what works, then make it last.
Conclusion and Next Steps
Your PMMA prototype has proven what works for bite, speech, and appearance, so we now copy success into the final bridge. The next steps are simple: wear the prototype a bit longer, note any small concerns, then we capture records and choose the definitive material. After lab fabrication, we deliver the final restoration and confirm the same quiet, clean contacts you approved.
In my full arch pmma temporaries workflow, the next steps are clear and predictable. At three weeks, a patient reports chewing feels natural and speech is clear. We schedule a focused check to verify fit and comfort, then scan the adjusted prototype with a fresh bite record. This preserves the proven contours and contact patterns so the lab can reproduce them exactly.
At home, watch for changes such as clicking, sharp edges, or food collecting, and tell us where you notice them. Small, conservative adjustments will be polished smooth, then documented so the final copies the improved shape. We also discuss material selection based on space, habits, and esthetics, aiming for durability and easy cleaning. Because the prototype already fit your daily life, the final should feel familiar on day one.
If you are deciding between full-arch care and tooth-by-tooth solutions, we can review options like custom crowns and bridges for single or short spans. Either path follows the same calm sequence: confirm comfort, capture what works, and communicate clearly with the lab. Next, we will outline maintenance, including recall timing, how to keep surfaces clean, and simple checks that protect long-term function. Clear steps now make the final visit smooth.
Copy what works, then make it last.
Frequently Asked Questions
Here are quick answers to common questions people have about PMMA Prototypes for Full-Arch: My Workflow in Glendale, AZ.
- What benefits do PMMA temporaries offer for healing?
PMMA temporaries support healing by protecting tissues and implants while allowing adjustments for comfort and function. They offer a smooth, polishable surface that is gentle on healing gums. Moreover, their adjustability means that bite and speech can be fine-tuned easily throughout the healing period, ensuring a comfortable fit as the mouth adjusts to new implants.
- How do PMMA prototypes improve speech during treatment?
PMMA prototypes are designed to adjust and improve speech by refining the placement and contour of the teeth. The prototypes allow patients to test ‘s,’ ‘f,’ and ‘v’ sounds, which helps ensure that the final prosthesis supports clear speech. Adjustments to incisal length or palatal contours can be made during the try-in phase to enhance phonetics.
- Can PMMA temporaries be adjusted chairside?
Yes, PMMA temporaries can be adjusted chairside. This allows for immediate refinements such as relieving pressure spots or smoothing occlusion points. The chairside adjustment capability helps maintain comfort and function, as minor esthetic or functional changes can be addressed on the spot without sending the prosthesis back to the lab.
- Are PMMA temporaries durable?
PMMA temporaries are quite durable, especially when milled from dense pre-polymerized blocks. They offer enhanced strength and reduce internal porosity, minimizing the risk of fractures. While not as permanent as final materials, their designed robustness helps withstand day-to-day wear during the healing and adjustment phases.
- How do PMMA prototypes affect patient satisfaction?
PMMA prototypes can significantly enhance patient satisfaction by providing a natural interim solution that mimics the final restoration’s look and feel. During the PMMA phase, patients can provide feedback on comfort, appearance, and function, which aids in refining the design for the final bridge, thus ensuring that the final product closely matches patient expectations.
References
- [1] Systematic review and meta analysis of mechanical properties of 3D printed denture bases compared to milled and conventional materials. (2025) — PubMed:40783443 / DOI: 10.1038/s41598-025-14288-2
- [2] Comparative Evaluation of Surface Roughness, Wettability, and Hardness of Conventional, Heat-Polymerized, Computer-Aided Designed and Milled, and Three-Dimensionally Printed Polymethyl Methacrylate Denture Base Resins: An In Vitro Study. (2025) — PubMed:40585711 / DOI: 10.7759/cureus.85008
- [3] Marginal Bone Level Changes in Full-Arch Rehabilitation: Digital Versus Analog Protocols-A 5-Year Retrospective Study. (2025) — PubMed:40721390 / DOI: 10.1111/cid.70080
- [4] Restorative Considerations, Prosthodontic Materials, Milling and Fabrication of Full Arch Final Restorations. (2025) — PubMed:39986973 / DOI: 10.1016/j.coms.2024.11.007
- [5] Effect of surface priming on the wettability of heat-polymerized polymethylmethacrylate, milled and 3D printed denture base polymers: An in vitro study. (2026) — PubMed:41205990 / DOI: 10.1016/j.jdent.2025.106221
- [6] In Vitro Evaluation of Plant Antimicrobials Against Candida albicans Biofilm on Denture Base Materials: A Comparison with Chemical Denture Cleansers. (2025) — PubMed:41228630 / DOI: 10.3390/polym17212869
- [7] A novel digital workflow for immediately loaded full-arch rehabilitations: The Columbus Digital Bridge Protocol. (2025) — PubMed:40919763
- [8] A 10-year Retrospective Study on Full-Arch Implant Prostheses: Comparison of Ceramic and Toronto Bridges. (2025) — PubMed:41061197 / DOI: 10.11607/jomi.11542